• Skip to main content
Help Center

Help Center

Uncategorized

Choose Connectors

Connectors facilitate easy connection to data sources, allowing you to upload and download the required documents and perform bulk operations. 

Users must have any one of the following policies to configure and utilise the connectors in Use case Designer. 

  • Administrator Policy 
  • Creator Policy

This guide will walk you through the steps on how to use the connectors to build the Use case Asset.

You can utilise the following Connectors to build your own Use case.

  • Amazon S3 Connector 
  • Database Connector
  • Rest API Connector
  • Web Crawler
  • Gmail Connector

Amazon S3 Connector

This connector allows you to retrieve and modify your AWS S3 resources.

  1. Drag and drop the selected Connector on the canvas and  link the connector from the    Start component using icon.


  2. Double click on the connector and select the following operations you want to perform using respective connectors. 
  3. In the Amazon S3 Connector window that appears,  select any one of the following actions.
    • Bulk upload to S3 
    • Bulk download from S3
    • Download from S3
    • Upload to S3
    • List files / Folder from S3
    • Delete file in S3


Upload to S3

  1. Select from the list of connections which are configured by the Administrator.


  2. Enter the Folder or file path where you want to download or upload in S3 and save the properties.

Note: If you wish to use a dynamic path instead of a static file path use the Dynamic file path checkbox.

  1. In the Output file, enter the output file name.
  2. Use the Dynamic file path check box if you wish to update S3 connector path at the time of execution.

Download to S3

  1. Select from the list of connections which are configured by the Administrator.


  2. Enter the Folder or file path where you want to download in S3 and save the properties.

Note: If you wish to use a dynamic path instead of a static file path use the Dynamic file path checkbox.

  1. In the Output file, enter the output file name.
  2. Use the Dynamic file path check box if you wish to download the S3 connector path at the time of execution.
  3. Click Save Properties to complete the connector settings.

Bulk Download from S3

  1. Select from the list of connections which are configured by the Administrator.


  2. Enter the Folder or file path where you want to download in S3 and save the properties.

Note: If you wish to use a dynamic path instead of a static file path use the Dynamic file path checkbox.

  1. In the Output file, enter the output file name.
  2. Use the Dynamic file path check box if you wish to download the S3 connector path at the time of execution.
  3. Use Download from Subfolder if you wish to download files from the subfolder .
  4. Click Save Properties to complete the connector settings.

Bulk Upload to S3

  1. Select from the list of connections which are configured by the Administrator.


  2. Select from the list of connections which are configured by the Administrator.
  3. Enter the Folder or file path  where you want to bulk upload to S3.
  4. Click Save Properties to save the S3 connector. 

Delete file in S3

  1. Select from the list of connections which are configured by the Administrator.


  2. Select from the list of connections which are configured by the Administrator.
  3. Enter the Folder or file path where you want to delete items in the S3 connector. 
  4. Click Save Properties to save the S3 connector. 

List files / folder from S3

  1. Select from the list of connections which are configured by the Administrator.


  2. Select from the list of connections which are configured by the Administrator.
  3. Enter the Folder or file path from which you want to list files/folders  in S3
  4. Click Save Properties to save the S3 connector.

Database Connector 

This connector allows you to create connections to the database. 

  1. Drag and drop the DB Connector on the canvas and  link the connector from the 
    Start component using icon.
  2. Double click the DB Connector.


  3. In the DB Connector window that appears,  update the following details.


    • In Select an action, select any one of the following options.
      • Select: Choose this option if you wish to retrieve data from the database using Select statement. 
      • SchemaInfo: Choose this option if you wish to retrieve information about the tables present in the database, their name, column name, data type, constraints and any other relevant details.
  4. In Choose your connection, choose the required DB connector that you wish to connect for the data retrieval.
    • In Query (applicable only for Select action), enter your query to retrieve the information. 
    • In Query Timeout (applicable only for the Select action), enter the query time in seconds.
    • In Schema name (applicable only for Schemainfo action) enter the schema name. 
    • In Table name (applicable only for Schemainfo action) enter the table name.
  5. Click Save Properties to save the DB Connector.

Rest API Connector

The Rest API Connector allows users the flexibility to connect to any existing REST API and quickly extract the necessary data.

  1. Drag and drop the Rest API Connector on the canvas and  link the connector from the 
    Start component using icon.


  2. Double click the Rest API Connector.


  3. In the REST API Connector window that appears,  update the following details.


  4. In API Name, enter a unique API name.
  5. In the API URL,  choose any one of the following methods and enter the API URL. 
    • GET : Choose this method if you wish to obtain information from the database or from a process.
    • POST: Choose this method if you wish to send information, either to add information to a database or pass the input of an Asset.
    • PUT: Choose this method if you wish to manage/update the information in the database.
    • DELETE: Choose this method if you wish to delete the information in the database.

.
Add Headers

  1. In the Header tab, enter the Key and Value information if you wish to add the header.


Add Authorization

  1. In the Authorization tab, select any one of the following authorization types.


    • None: Choose this option if you don’t use authorization. 
    • Basic: Choose this option if you wish to use basic authorization using Username and Password.
    • Bearer token:  Choose this option if you wish to use the authorization using Bearer token. 

Add Parameter

  1. In the Params tab,  enter the query parameters such as Key and Value.


Note: If you wish to add the Path Params, use “{  }“ in the API url. Its allows you to access the path Params


Add Body

Note: The body is mainly helpful for the POST method.

  1. In the Body tab,  enter the body content in JSON format.


  2. Click Save to save the Rest API Connector.

Web Crawler

  1. Drag and drop the Web Crawler on the canvas and  link the connector from the 
    Start component using icon.


  1. Double click the Web Crawler.


  2. In the Web Crawler window that appears,  update the following details.


    • In File Type, select any one of the following options
      • All:  Choose this option if you wish to crawl the html and PDF files from the web.
      • Html:  Choose this option if you wish to crawl only the html pages from the web.
      • PDF: Choose this option if you wish to crawl only the PDF files from the web
    • In Scrap Level, enter the level that you wish to fetch information from the web page. The scrap level refers to the depth or level of pages that the web crawler will scrape or visit during its crawling process. It determines how deep into a website’s structure the crawler will go to gather information.

      For example: If you’re using a web crawler to gather information from a news website you set the scrap level to 2, the crawler will visit the homepage (level 0), then follow links to articles (level 1), and possibly follow links within those articles to other pages (level 2). It won’t go deeper than the specified level.
    • In Maximum URL’s, enter the total number hyperlinks the web crawler will fetch  information from.  The maximum URL refers to the limit on the number of URLs or links that the web crawler will process during its crawling operation. This limit helps control the crawler’s workload and prevents it from endlessly crawling through an excessively large number of URLs.

      For example: If you’re using a web crawler to collect data from a bank’s website and you set the maximum URLs to 100, the crawler will stop after it has visited 100 different pages on the bank’s website, ensuring it doesn’t spend too much time crawling endless links.
  1. Click Save to save the Web Crawler.

Gmail Connector

Gmail connector is helpful to connecting google mail with a Use case Asset. It can be tailored to individual user Gmail and seamlessly integrates with existing email platforms to monitor incoming messages

  1. Drag and drop the Email Connector on the canvas and  link the connector from the 
    Start component using icon.


  2. Double click the Email Connector.


  3. In the Email Connector window that appears,  update the following details.


    • In Choose your connection, select the configured connection that you wish to connect.
    • In Folder Path, enter the folder path name that you wish to connect to the email retrieval. For example, Custom, Inbox, primary.
  1. Click Save Properties to save the Email Connector.

June 2024

June 29, 2024

Version: 1.6.0.0

New


Introducing Powerful New Features for Importing and Managing Documents in Document Library

  • S3 Connector: Leverage the power of Amazon S3 for simplified document import. The new S3 Connector facilitates seamless document import directly from the S3 console into your Document Library. For more information, see Upload Documents.

  • Web Crawler: We’ve introduced a Web Crawler feature in the Document Library. This feature allows you to import documents directly from web pages and store, expanding your document management capabilities. For more information, see Upload Documents.

Build a Multi-Agent Network


A Multi-agent network involves multiple autonomous agents working together to achieve a common goal. Each agent in the network is designed to perform specific tasks, communicate with other agents, and make decisions based on real-time data. In the context of enterprises, an AI-powered multi-agent network can integrate various tools and processes, streamlining operations, enhancing decision-making, and ultimately improving client service. 

The ReACT (Reasoning and Acting) template is a type of Artificial Intelligence template designed to enhance the decision-making and problem-solving capabilities of multi-agent systems. It combines reasoning (thought processes to understand and interpret information) with acting (taking actions based on reasoning outcomes). This integration allows ReACT agents to handle complex tasks that require both cognitive and operational skills.

Purple Fabric enables agentic workflows with multi-agent systems. Each expert agent in an agentic system can be powered by the LLM best suited to that agent from a quality, speed, and cost perspective. 

Users must have the Gen AI User policy to create a Multi Agent Network in Purple Fabric.

Sample Use Case: Business Assurance Lead

This guide will walk you through the steps to build a multi-agent network in a Wealth Management firm using Purple Fabric. The network involves multiple financial advisors and a Business Assurance Department that ensures the advice given to clients adheres to guidelines. The assurance team performs compliance checks, audits, and safeguards the integrity of financial services. The agents involved are the Business Assurance Lead, Business Assurance QA, and Business Assurance Writer.

  1. Create an asset
  2. Select a prompt template
  3. Select a model and set model configurations
  4. Provide the system instructions actions and Examples
  5. Run the model and view results
  6. Validate and benchmark asset
  7. Publish the asset
  8. Consume the asset

Step 1: Create an asset

  1. Head to the Asset Studio module, click Create Asset then choose Generative AI.


  2. In the Generative AI window that appears, enter Asset Name.


  3. Optional: Enter Description and upload a Display image. 
  4. In Type, choose Conversational Agent.
  5. In Asset Visibility, choose any one of the following options.
    • Private (default): Choose this option to ensure that only you, the owner, can view and manage the asset. 
    • All Users : Choose this option to share the asset with everyone in the workspace who has the appropriate permissions to view and manage the asset

Step 2: Select a prompt template

  1. On the Gen AI Asset creation page that appears, choose ReAct Prompt template.


Step 3: Select a model and set model configurations

Select a Model

  1. Select a model from the available List, considering model size, capability, and performance. For more information about the model, see Model Capability Matrix.


Set Model Configuration

  1. Click 
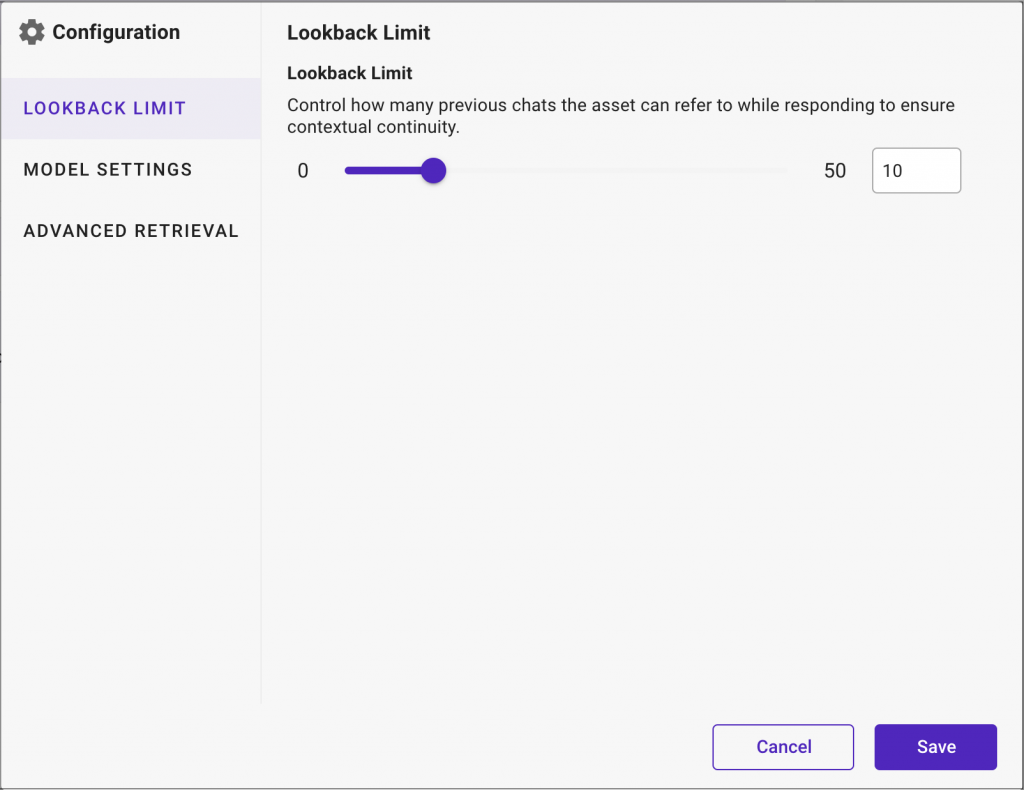
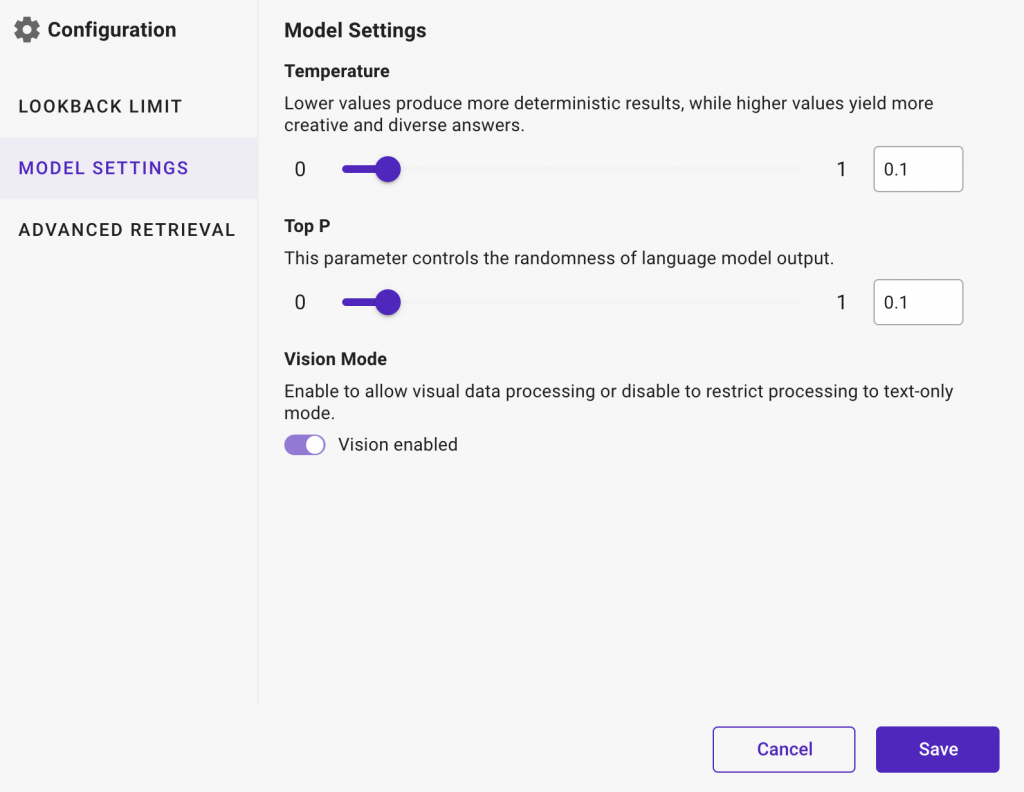
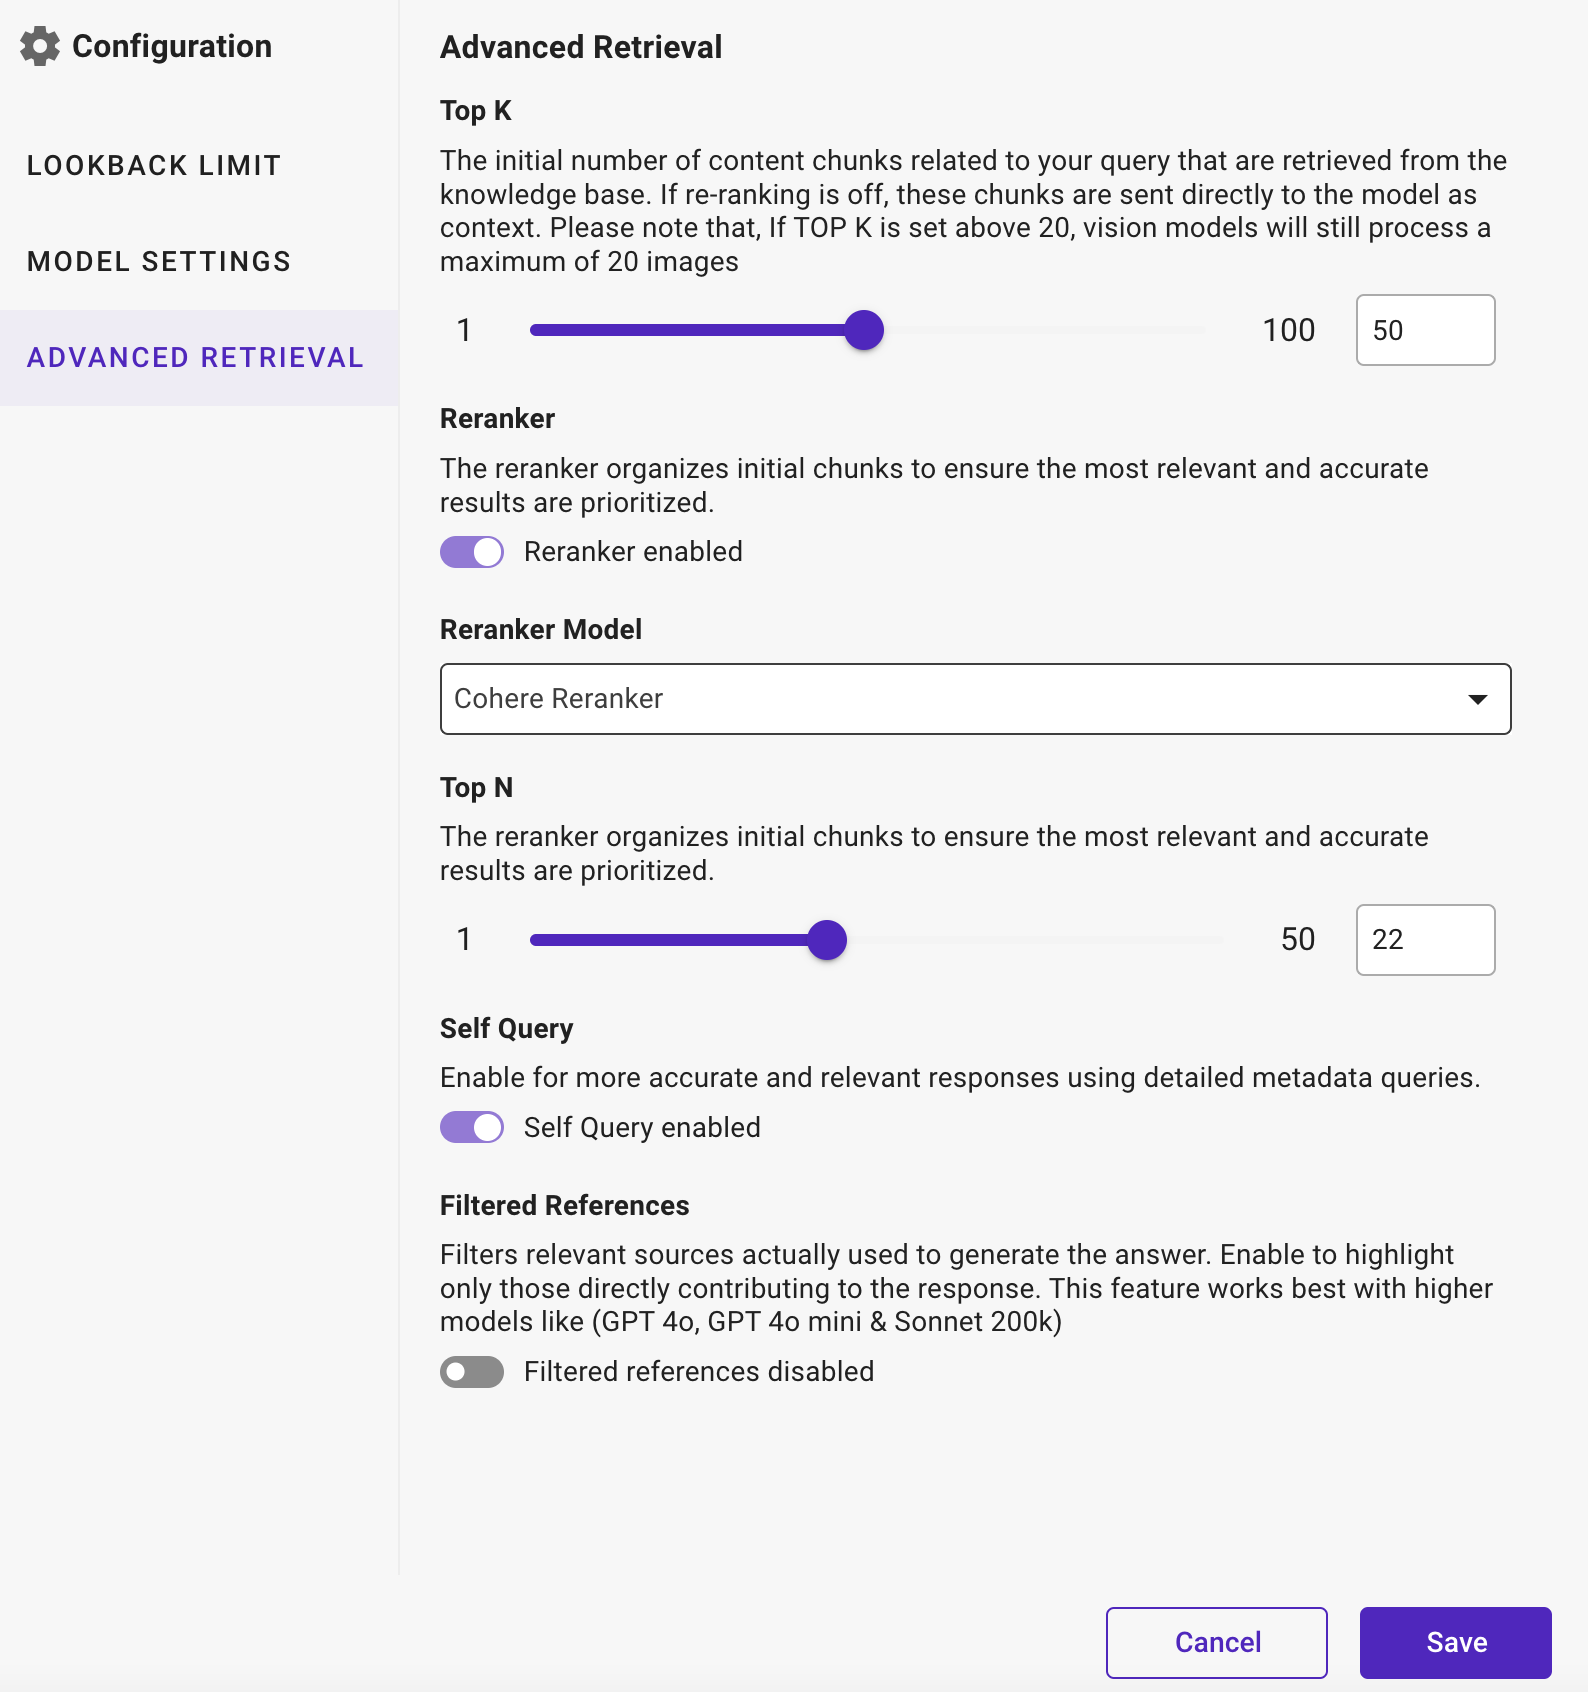
and then set the following tuning parameters to optimize the model’s performance.  For more information, see Advance Configuration.

Step 4: Provide the system instructions, actions and Examples

Provide System Instruction

A system instruction refers to a command or directive provided to the model to modify its behavior or output in a specific way. For example, a system instruction might instruct the model to summarize a given text, answer a question in a specific format, or generate content with a particular tone or style.

  1. Enter the following System instructions by crafting a prompt that guides the agent in helping advisors.  


Add Actions

  1. In the Actions section, click Add.


  2. In the Actions window that appears, Use the search bar to find the following agents.


    • Sarah – Business Assurance QA
    • James – Business Assurance Writer

  3. On the Actions window, click against the respective agents you wish to add, and then, click X to close the Actions window.


Manage Agents

  1. In the Actions section, provide the detailed description against each added Actions.


  2. Use enable options to activate the Actions. 


Note: Providing the detailed description helps the LLM model to understand the context better against the actions

Provide Examples

Examples help the content creation task at hand to enhance the agent’s understanding and response accuracy. These examples help the agent learn and improve over time.

  1. In the Examples section, click Add. 


  2. In the Examples section, update the following information: 
    • Question: Initial query raised.
    • Thought: Considerations or analysis related to the question.
    • Action: Steps planned or taken in response to the question.
    • Action Input: Inputs or resources needed to carry out the action.
    • Observation: Monitoring or assessment of the action’s effectiveness.
    • Thought: Further reflections or insights based on the observation.
    • Final Answer: Conclusive response or resolution to the initial question.

Step 5: Run the model and view results

  1. In the Debug and Preview section, enter the prompt in the query bar to seek the required answers.


  2. Click or press Enter key to run the prompt. 
    Review the generated response to ensure it adequately addresses or clarifies your query.


    • Click Reference if you wish to view the reference of the output.


    • Select the respective field information to view its reference.

    • Provide your feedback using the like and dislike options. For more information, see Provide Feedback.
  3. If necessary, provide examples to enhance the conversational agent’s understanding and response accuracy for answering questions.

Note: If the answer falls short of your expectations, provide additional context or rephrase your prompt for better clarification.

Step 6: Validate and benchmark the asset

Benchmarking allows you to compare the performance of different models based on predefined metrics to determine the most effective one for your needs.

  1. In the Debug and preview section, click Benchmark.


  2. In the Benchmarks window that appears, click Start New to benchmark against predefined metrics to determine the most effective model.

Add Input and Expected Output

  1. On the Benchmark page,  click
  2. In the Input and Expected output field that appears, enter the example input and the expected output.
  3. Click to add more Input and Expected output fields.

Add additional Benchmark

  1. On the Benchmark page that appears, click to add additional benchmarks.
     
  2. In the Benchmark window that appears, click Model and prompt Settings.


  3. In the Model and Prompt Settings window, choose another mode for the comparison
  4. Click and adjust the metrics as required to compare the output of the models against each other. For more information about the metrics, see Advance Configuration.

  5. Click Save to add the model for the Benchmark.

Validate

  1. On the Benchmark page, click the Re-run prompt.    


  2. In the Benchmark model section, you can get the response
  3. Compare the response of the models based on the tokens, score, latency and cost which will determine which is the best suited model to be deployed for your use case.
  4. Preview, like or dislike the results to notify fellow team members. 

Definition of Metrics

  1. On the benchmark page, click metrics. to define and adjust metrics settings.
  2. In the Metrics that appears, choose the following  metrics that you wish to compare with the models.
    • Cost: Cost refers to the financial expenditure associated with using the language model. Costs vary based on the number of tokens processed, the level of accuracy required, and the computational resources utilized.
    • Latency: Latency refers to the time delay between a user’s input and the model’s output.Latency can be influenced by various factors such as the complexity of the task, the model’s size, and the computational resources available. Lower latency indicates faster response times.
    • Tokens: “tokens used” typically refers to the number of these units processed to generate a response. Each token used consumes computational resources and may be subject to pricing.
    • Rough L: Rouge L calculates the longest common subsequence between the generated text and the reference text. It evaluates the quality of the generated text based on the longest sequence of words that appear in both texts, regardless of their order
    • Answer Similarity: Answer Similarity measures how similar the generated answers are to the reference answers. It can be computed using various similarity metrics such as cosine similarity, Jaccard similarity, or edit distance.
    • Accuracy:  Accuracy measures the correctness of the generated text in terms of grammar, syntax, and semantics. It evaluates whether the generated text conveys the intended meaning accurately and fluently, without errors or inconsistencies
  3. You can view the selected metrics against the models.

Step 7: Publish the asset

  1. If the desired accuracy and performance for getting answers from the document has been achieved, click Publish.


  2. In the Asset Details page that appears, enter the Welcome Message, Conversation Starters and Asset Disclaimer.


Step 8: Consume the asset

  1.  Head to the Gen AI Studio module. Use the Search bar to find an Asset.  


  2. Select an Asset that you wish to consume.


  3. In the Conversational agent that appears, initiate a conversation by asking the asset a question based on multi agent network.


Advance Configuration


  1. Click and then set the configurations to optimize the model’s performance, if you wish to fine-tune the configurations of your Agent. 

Lookback Limit

Note: This setting is applicable only to Conversational Agents and is not applicable to Automation Agents

Define the ‘Lookback Limit’ to control how much historical chats the asset can refer to when generating responses. is crucial for tasks that benefit from contextual continuity.

  • Choose any limit from 0 to 50 and control the amount of historical chat considered. 

Model Settings

  • Temperature:  Choose any limit from 0 to 2  to control the randomness of the generated content. 

    • For example, lower values produce more deterministic results, while higher values yield more creative and diverse answers.

  • Top P: Choose any limit from 0 to 1 to  set a threshold for cumulative probability during word selection, refining content by excluding less probable words.

    • For example, setting top_p to 0.7 ensures words contributing to at least 70% of likely choices are considered, refining responses.

  • Vision (Applicable only for Bedrock Cloude3 Haiku model): Enable Vision option to decide if visual data processing is required.

Advanced Retrieval

You can configure these settings if you are using the RAG prompt template.

  • Top K: Choose any limit from 1 to 20 to limit the AI model to considering only the most probable words for each token generated, aiding in controlling the generation process.

    • For example, setting top_k to 10 ensures that only the top 10 most likely words are considered for each word generated.
  • Reranker: Enable the Reranker to organize initial chunks ensuring that the most relevant and accurate results are prioritized during the response generation process. This helps in refining and improving the quality of the Agent generated content by reorganizing the initial candidate answers or information chunks based on relevance criteria.

  • Reranker Model: Choose any one of the following models for reranking:

    • Cohere: Choose this option to develop versatile large language models (LLMs) that excel in various natural language processing (NLP) tasks such as text generation, summarization, translation, and conversational AI. These models enhance customer interactions, content creation, search capabilities, and text analysis.
    • Colbert: Choose this option (Contextualized Late Interaction over BERT) to improve the relevance and accuracy of search results. It leverages advanced contextual understanding and efficient query-document matching, making it ideal for large-scale information retrieval systems.

  • Top N: Choose any limit from 1 to 100 to rerank the top N most relevant and accurate chunks of information, refining output by prioritizing candidate responses or segments that best meet user needs. This setting enhances response quality by focusing on key information segments, ensuring effective and tailored content delivery.

    • For example: Suppose a user asks, “Can you explain the benefits of cloud computing?” With Top N set to 3, the AI can identify and rerank the top 3 most relevant chunks of information related to cloud computing benefits. These chunks might include scalability advantages, cost-efficiency considerations, and enhanced data security features. By focusing on these key aspects, the AI delivers a well-organized and informative response that highlights the most significant benefits of cloud computing, tailored to the user’s query.

  • Self Query: Enable for more accurate and relevant responses using detailed metadata queries. This feature is particularly beneficial as it allows to tailor responses closely to the specific context and details provided within the query itself, leading to more accurate and useful information retrieval.

    • For example: If a user asks, “How does quantum computing work?”, the Agent, utilizing Self Query, can refine its response by analyzing specific metadata within the query, such as focusing on explaining quantum computing principles and algorithms without delving into unrelated topics like classical computing, thus ensuring the response is directly tailored to the user’s query.

  • Filtered Reference: Enables to ensure that only relevant content chunks, filtered by the LLM used in the output, are returned. It enables more effective validation of  model-generated responses more effectively by focusing on the most relevant data.

    This feature filters relevant sources that are actually used to generate the answer. It enables  highlighting only those sources that directly contribute to the response. This feature works best with higher models like GPT 4o, GPT 4o mini & Sonnet 200k.

February 2024


February 3, 2024

Version: 1.5.2.1

New


  • The “URL aliases” feature has been introduced in the Administrator module. This feature allows the users to

    • Simplify and enhance the readability of the URLs used in the Asset APIs.
    • Consume different versions of an Asset via a single API.

For more information, see URL aliases

Updates


  • The “Validate” feature has been improved to review results for image captured from documents. Users can now view accuracy of data extracted from these images, thereby boosting their confidence in the results.

Configure the Email Connector


The Email Connector feature acts as a crucial bridge connecting email with a Use case Asset . It can be tailored to individual user emails and seamlessly integrates with existing email platforms to monitor incoming messages. When an email is received, the connector promptly gathers its content and attachments, streamlining the process for processing or transmitting them to the designated asset. This efficient system guarantees that important information shared via email is promptly available and actionable within the Use case Asset.

Users must have the Administrator Policy to configure an Email Connector. 

This guide will walk you through the steps on how to configure an Email Connector.

  1. Head to the Administration module, choose Connections and then click Create New.


  2. In the Select Connector window that appears, select Email Connector.


  3. On the Email Connector page that appears, enter the following details. 


  • In Connection Name, enter a unique and descriptive name for the email connection.
  • In Email ID, enter the email address that is associated with your account.

Note: Currently, Email Id is  designed to work only with Gmail accounts. We’re working on supporting other email services soon. In the meantime, if you want to configure your email address with a different service , reach our support team at mapsupport@intellectdesign.com.

  • In Password, enter the password that is associated with the email account.
  • In Server URL , enter the URL of the email server.
  • In Server Port, enter the port number used by the email server.
  1. Double-check all the entered information and then click Submit.
  2. Your email connector is successfully configured to connect to your email address.

Note:

  • Ensure that the provided email credentials are kept confidential and not exposed to unauthorized users.
  • Regularly review and update the email account password to enhance security.
  • Consider implementing multi-factor authentication (MFA) for additional protection against unauthorized access.
  • « Go to Previous Page
  • Page 1
  • Page 2
  • Page 3
  • Page 4
  • Page 5
  • Interim pages omitted …
  • Page 10
  • Go to Next Page »

© ­Intellect Design Arena Ltd,