
Extended Input and Output Capabilities [NEW]
Overview
This section provides a comprehensive guide to the expanded input, output, and processing capabilities within Purple Fabric. Users can now natively process, manipulate, and generate standard document types like PPT, PPTX, PDF, DOC and DOCX alongside cloud productivity ecosystems such as Google Docs, Google slides, MS Word and MS PowerPoint directly inside Conversation Agents, Automation Agents, and Automated Workflows.
All eight document types share a unified implementation footprint across Purple Fabric modules:
- Conversation Agent: Accepts supported files directly in the chat window, process them contextually, and output newly generated or modified files.
- Automation Agent: Execute structured background jobs and data extraction pipelines.
- Automated Workflows: Accessible through two structural components on the workflow canvas:
- Standalone Node: A dedicated, single-purpose node (e.g., PDF Node, Google Docs Node) where users select predefined actions from a dropdown menu.
- Agent Node: Direct orchestration of an existing, configured Automation Agent within a broader multi-node sequence.
Presentation Tools (PPTX & PPT) [New] Documentation Tools (PDF, DOCX & DOC) [New] Cloud Presentation & Documentation Tools (Google Slides, Google Docs, MS PowerPoint 365 Online & MS Word 365 Online) [New]
Presentation Tools (PPTX & PPT)
Purple Fabric handles both the new (.pptx) and legacy (.ppt) PowerPoint formats natively, completely eliminating dependencies on external conversion platforms.
How to - Use Presentation Tools
This segment provides you guidance on how to use the native presentation support tools effectively.
Refer to the following sections to know more:
Integrate Presentation Tools in Conversational Agents Integrate Presentation Tools in Automation Agents Integrate Presentation Tools in Automated Workflow
1. Integrate Presentation Tools in Conversational Agents
The Presentation Tools enable Conversational Agents to read existing slides, modify layout assets, or generate brand-new decks dynamically during a chat session.
Step 1: Add Presentation Capabilities to the Agent
-
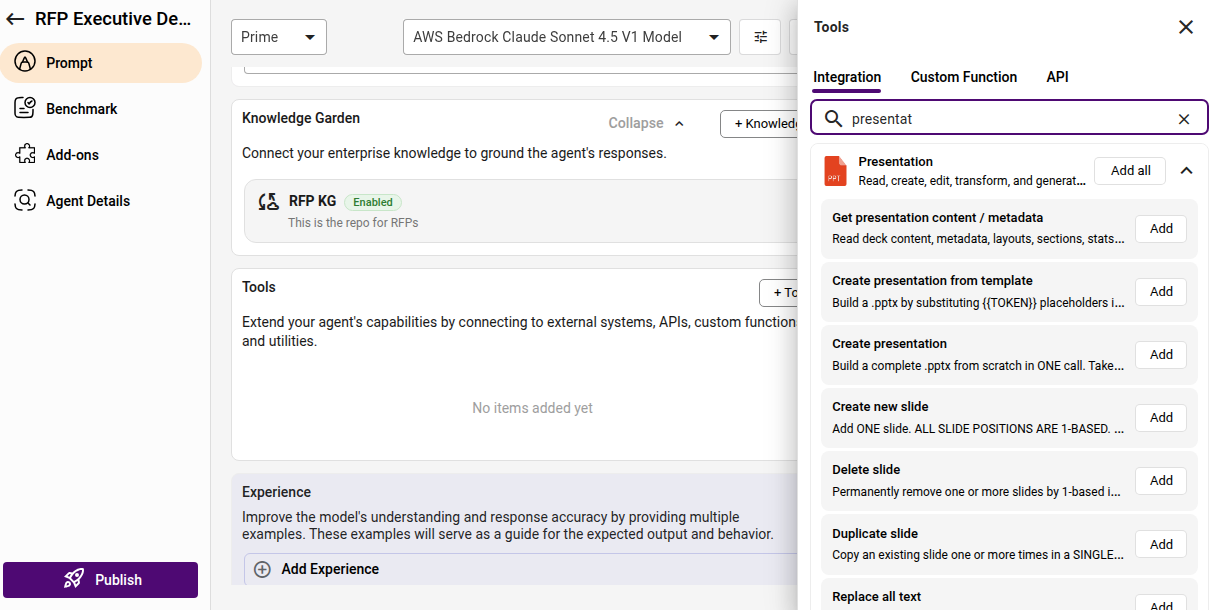
Go to your Conversation agent and navigate to the Tools section in the configuration panel.
-
Click + Tool and search for the Presentation tools category. All the existing presentation tools appears in list as shown in the screenshot below:
-
Select all or specific capabilities your agent requires (such as Read / Parse Presentation, Create Slide, or Replace All Text) from the action list.
Step 2: Run the Agent and Interact
- Launch your agent in the chat interface.
- For Reading/Analysis: Upload a presentation file into the chat and ask the agent to summarize it, extract tables, or pull speaker notes.
- For Editing/Generation: Prompt the agent to make updates (e.g., "Change the client name placeholder on all slides to Acme Corp" or "Create a new slide with a summary table").
Step 3: Access Your Output File
- Once the agent finishes processing your request, it will generate the updated or newly created presentation.
- Click the downloadable file link or use the direct preview panel inside the chat window to view your finished .pptx deck.
Example Scenario: A proposal team uses a Conversational Agent grounded in their RFP Knowledge Garden to generate a client presentation; by prompting the agent in the chat to update their standard template for a new client named "Acme Corp," the agent automatically executes the attached presentation tools to find and replace text tokens, inject compliance data, and return a finalized, presentation-ready deck via a downloadable link.
2. Integrate Presentation Tools in Automation Agents
Automation Agents use presentation tools to run background processes, data-scraping transformations, and headless reporting workflows without human intervention.
Perform the following steps to link presentation capabilities to an Automation Agent:
-
Open your Automation Agent and navigate to the Tools Configuration panel.
-
Click Add Tool and filter by Presentation .
-
Select and attach the specific structural tools needed for your background job (e.g., Batch Update Deck, Merge Multiple PPTX Files).
-
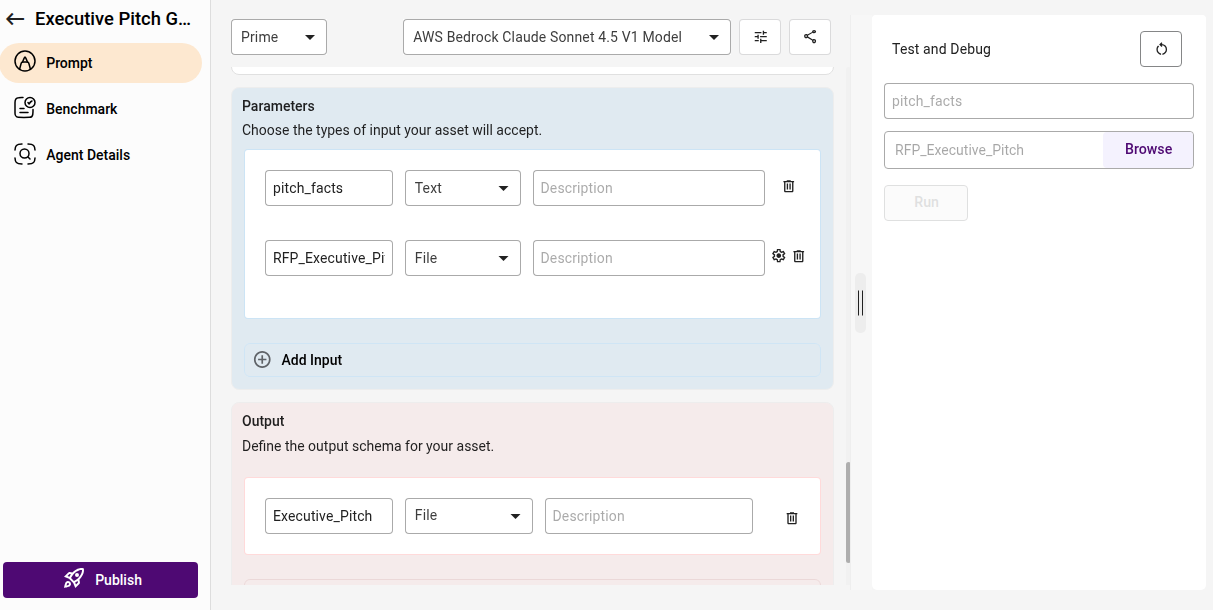
Define the Data Directory or file paths where the agent will pick up input decks and write output files.
3. Integrate Presentation Tools in Automated Workflows
Workflows allow you to build automated step-by-step pipelines on a visual canvas using two different node configurations:
Method 1: Using a Standalone Node
- Open your workflow canvas and locate the node library.
- Drag and drop the dedicated PPTX or PPT node onto the canvas.
- Click the node to open its configuration panel and select a single specific action (e.g., Convert to PDF, Duplicate Slide) from the dropdown list.
- Route data wires to pass file references from preceding nodes into this standalone processor.
Method 2: Using an Agent Node
- Drag an Agent Node onto your workflow canvas.
- In the node settings, select an existing Automation Agent that already has presentation tools configured.
- This allows the workflow to hand off complex, multi-step slide processing logic to a specialized agent sub-routine.
Presentation Operations Reference Table
Presentation Tools Restrictions
- No Native Image Insertion: You cannot insert new images or set image backgrounds through the tool. Images must be added directly in PowerPoint or pre-placed in a template before processing.
- No Animation Authoring: The system cannot create new animations. However, existing animations are preserved when duplicating or merging slides, and slide-level transitions can still be configured via 'ppt bulk update'.
- No Password Protection Support: Encrypted or password-protected slide decks are not supported. You must decrypt the files externally before sending them for processing.
- No Media Embedding: Video and audio files cannot be embedded into presentations. You must link to these assets externally or add them manually in PowerPoint after the file is generated.
- Rendering Fidelity on Export: Exports are processed via LibreOffice, so the visual results may differ slightly from native Microsoft PowerPoint (especially regarding auto-fit font sizes and specific effects). It is recommended to set explicit font sizes for decks intended for export.
- No Custom Font Embedding: Custom font files cannot be embedded into the deck; fonts are instead pulled from the presentation's theme. Note that 'embed fonts' are not supported in headless mode and will be refused.
- Export Format Restrictions: Exporting to the ODP format is not supported in headless mode. Please use PDF, PNG, or JPEG for your export requirements.
- Single-Writer Locking: The system utilizes a single-writer lock; if a file is busy, the system will raise a LockAcquisitionTimeout. To avoid this, prefer using 'ppt bulk update' instead of making many separate, individual calls.
- Dynamic Index Shifting: During a bulk update, slide indices resolve against the deck state at the exact time each operation runs. This means earlier actions (like adding, deleting, or reordering) will shift the indices for later actions. Use stable 'slide ids' or carefully plan the order of your operations.
- Automatic Collision Avoidance: By default, new shapes, tables, or charts are automatically clamped and shrunk to prevent overlapping with existing content. You can bypass this for decorative layers by 'setting allow_overlap: true'.
- Placeholder Restrictions: Operations that attempt to cover more than 30% of an existing placeholder will be refused unless you specifically set 'clear_content_placeholder: true'.
- Slide Title Management: Do not attempt to use 'ppt insert shape' to recreate slide titles or subtitles. These should be defined specifically via the 'slide_def.title' and 'slide_def.subtitle' parameters.
- 1-Based Indexing: All slide positions are 1-based, meaning the first slide in a deck is always at 'slide_index: 1'.
- Slide Dimensions: All canvas dimensions are measured in inches. For example, a standard 16:9 widescreen slide is defined as 13.33 x 7.5 inches.
- Strict JSON Formatting: All fields involving JSON-shaped data (such as slides, table_data, chart_data, and runs) must be passed as valid JSON strings using double-quoted keys.
Documentation Tools (PDF, DOC & DOCX)
Purple Fabric securely handles both universal document layouts (PDF) and standard word processing formats (modern .docx and legacy .doc) natively, eliminating the dependencies on any external tools for reading, editing, and generating enterprise documents.
How to - Use Document Tools
This segment provides you guidance on how to use the native document support tools effectively.
Refer to the following sections to know more:
Integrate Document Tools in Conversational Agents Integrate Document Tools in Automation Agents Integrate Document Tools in Automated Workflows
1. Integrate Document Tools in Conversational Agents
The Document Tools enable Conversational Agents to read existing documents, manage layouts, or generate brand-new files dynamically during a chat session.
Step 1: Add Document Capabilities to the Agent
-
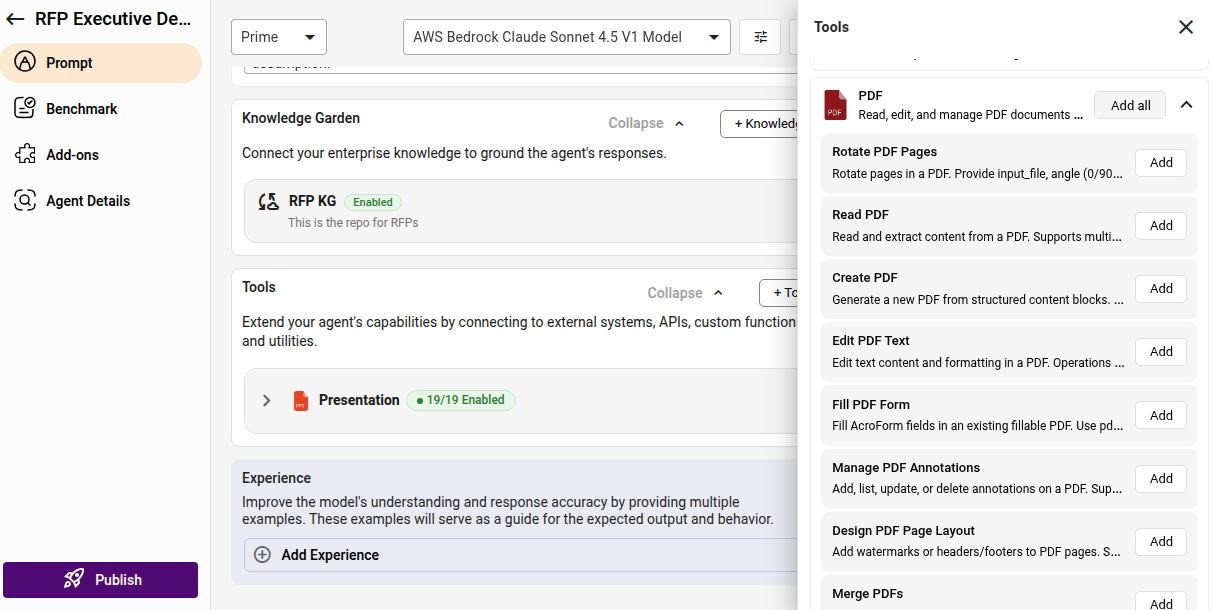
Go to your Conversation agent and navigate to the Tools section in the configuration panel.
-
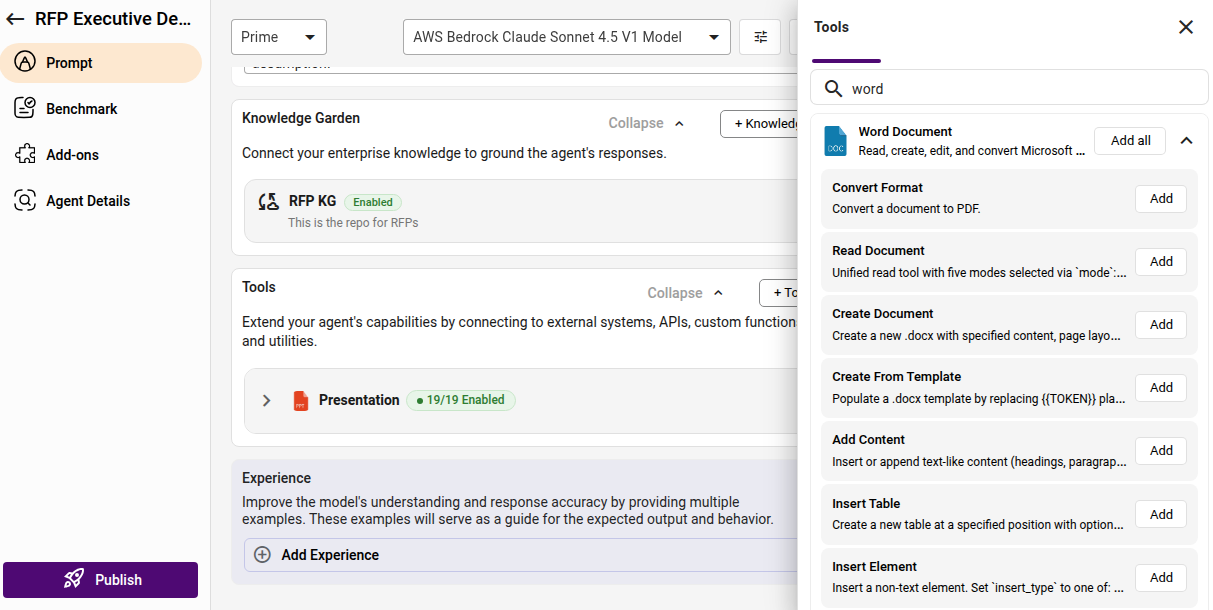
Click + Tool and search for the PDF or Word Document tools category. All the existing document tools appear in a list.
-
Select all or specific capabilities your agent requires (such as Get PDF Text, Create Document, or Find and Replace Text) from the action list.
Step 2: Run the Agent and Interact
- Launch your agent in the chat interface.
- For Reading/Analysis: Upload a PDF, DOC, or DOCX file into the chat and ask the agent to summarize the text, extract tables, or read metadata values.
- For Editing/Generation (Full CRUD): Prompt the agent to make layout changes (e.g., "Find and replace 'Old Company Name' with 'New Company Name' everywhere" or "Fill out this PDF form data with my profile information").
Step 3: Access Your Output File
- Once the agent finishes processing your request, it will generate the updated or newly created file.
- Click the downloadable file link or use the direct preview panel inside the chat window to view your finished .pdf or .docx document.
2. Integrate Document Tools in Automation Agents
Automation Agents use document tools to execute heavy background processes, parse bulk tabular data, or handle document conversion pipelines without human intervention.
Perform the following steps to link document capabilities to an Automation Agent:
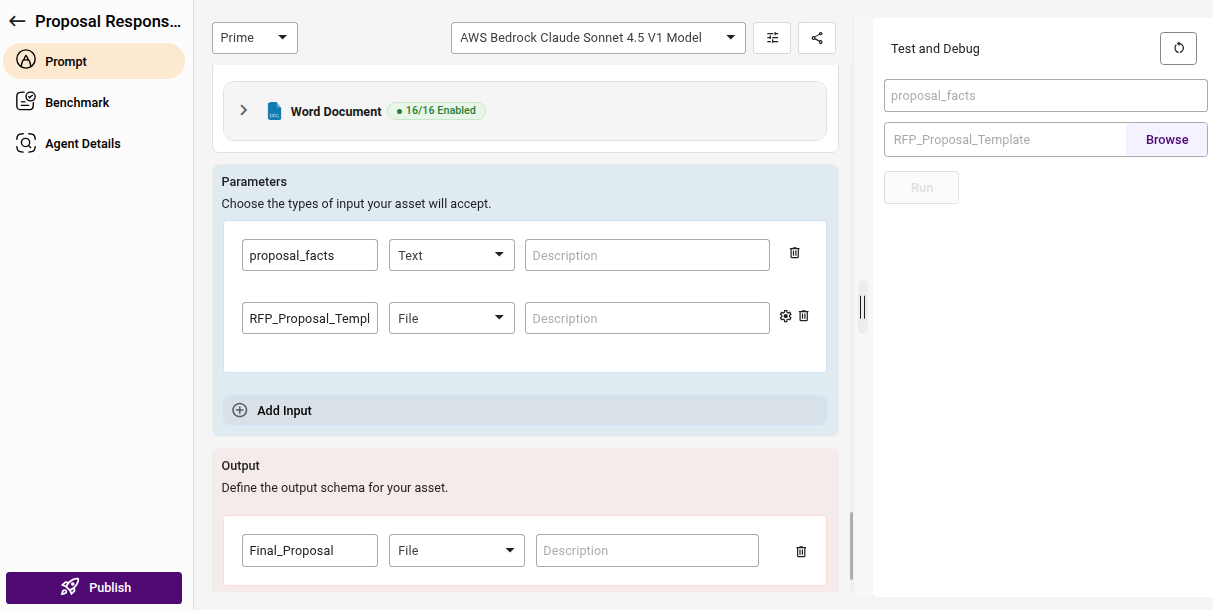
- Open your Automation Agent and navigate to the Tools Configuration panel.
- Click Add Tool and filter by PDF or DOCX.
- Select and attach the specific tools needed for your background processing job (e.g., Merge Multiple PDFs, Batch Update Document, or Bulk Update Text).
- Define the Data Directory or file paths where the agent will pull input documents and output finalized files.
3. Integrate Document Tools in Automated Workflows
Workflows allow you to build automated, multi-step document pipelines on a visual canvas using two different node configurations:
Method 1: Using a Standalone Node
- Open your workflow and locate the node library.
- Drag and drop the dedicated PDF or DOCX node onto the canvas.
- Click the node to open its configuration panel and select a single specific action (e.g., Convert to PDF, Append Text, Extract Tables) from the dropdown list.
- Route data wires to pass file references from preceding nodes into this standalone processor.
Method 2: Using an Agent Node
- Drag an Agent Node onto your workflow canvas.
- In the node settings, select an existing Automation Agent that already has the required document tools.
- This enables the workflow to hand off complex, multi-step document compilation or parsing logic to a specialized agent sub-routine.
PDF Operations Reference Table
PDF Tools Restrictions
- Scanned PDFs (Image-Only): The system cannot extract text from scanned documents. Tools like 'get text' and 'extract tables' will fail and throw an Error, though page-level operations (like rotate, merge, split, delete, or watermark) still function normally.
- No Digital Signatures: The platform cannot apply or verify digital signatures. You can apply signatures using external tools like DocuSign or Adobe Sign afterward.
- No Password Protection Support: Locked or encrypted PDFs are not supported. You must decrypt and remove password protection from the file externally before sending it to the pipeline.
- No Cross-Page Text Reflow: PDFs use a strict, fixed layout. If your replacement text is too long, it cannot push content to the next page and may overlap with surrounding elements. Always design your templates with enough vertical space.
- No Custom Font Embedding: Only 14 standard core fonts are available (Helvetica, Courier, Times-Roman, and their variants). In practice, the visual difference from standard fonts like Arial or Calibri is minimal.
- No Native Multi-Column Layouts: The 'pdf create' tool does not natively support multi-column page formatting. To place content side-by-side, use a borderless 2-column table to simulate the layout.
- No Visual Asset Extraction: You cannot extract raw, individual image pixels directly out of a PDF document.
- No PDF/A Archival Compliance: Generated documents do not meet strict long-term PDF/A preservation standards; use dedicated archival tools if long-term compliance is required.
- No Bookmark Creation: The system can read and split files using existing bookmarks, but it cannot generate brand-new ones.
- Multi-Page Table Boundaries: The 'pdf insert table' tool cannot automatically split a single table across page breaks. For large tables that span multiple pages, use 'pdf create' to build them out and 'pdf merge' to stitch the segments together.
- Special Character Bold Styling: Bold formatting may fail to apply when the replacement text contains special Unicode currency symbols (like ₹ or €). The text will still render correctly, but in a regular font weight.
- Volume Limits per Call: Text extraction is capped at a maximum of 25 pages per call. You must use the 'page range' parameter to target content beyond the 25-page threshold.
- Simultaneous File Write Risk: If two operations attempt to write to the exact same file at the same time, the last write to finish will overwrite the other. Always use the 'bulk update' tool instead of triggering multiple separate calls to ensure data integrity.
Word Document Operations Reference Table
DOC & DOCX Tools Restrictions
- No OCR Support: Documents whose bodies consist entirely of images will return empty text.
- No Inline Image Extraction: Extracting images during a read operation is not implemented; the 'include images' parameter will always return an empty list. To get a visual snapshot of the file, use 'convert format' to PNG or JPEG.
- Export Failure on Tall Table Rows: Exporting a document to PDF, PNG, or JPEG will fail with a layout error if a single table row is taller than the page height. To fix this, split tall rows, reduce cell content, or export to HTML/TXT instead.
- Excluded Footnotes and Comments: Standard reading and text extraction tools (read / get text) do not include footnotes or comments. You must use 'manage comments' or search specifically with the parameter 'search in: comments'.
- Table Cell Content Visibility: Table cell text is hidden from standard reading, searching, filtering, styling, and restructuring tools. You must use 'find replace' with the scope set to tables or all, or use 'update table' for targeted cell edits.
- Lost Layout Order on Read: The 'read' tool extracts and lists all text paragraphs first, then appends all tables at the very end of the output, losing the original interleaved layout order. Use 'convert format' to PDF when layout fidelity is required
- Static Table of Contents (TOC): Generated TOCs are completely static and hyperlink-based; they are not live Word fields and do not track page numbers. You must manually regenerate the TOC after making structural edits.
- Hyperlink Inserter Restrictions: You cannot hyperlink text that already exists inline. Inserting a hyperlink will always generate a brand-new paragraph.
- Uniform Document Settings: Applying document settings configures the entire file uniformly across all sections. If individual sections require different settings, build them as separate documents first and merge them later.
- Minimal HTML Exports: HTML exports contain minimal tags and no actual visual styling. Use PDF for presentations and Markdown for clean, structured text.
- Superficial File Merging: Merging files deeply copies the core body XML only. It does not remap image relationships, hyperlinks, list numbering, or underlying styles. Keep your images and links inside the primary base document, or flatten them to text before merging.
- Ignored Formatting and Missing Metadata: The 'vertical alignment' parameter is accepted by the system but will not be applied to the layout. Additionally, the 'page count' metadata property will always return null.
- Mixed Inline Formatting Risks: Running 'find and replace' or inline styling tools rewrites the target paragraphs into fewer data runs. Any mixed inline styling (like a single bold word in a regular sentence) may be lost where the edits land.
- Template Token Placement: Image and table tokens processed from templates are automatically appended to the very end of the document, rather than being positioned in-place.
- First-Match Targeting: Most anchored document operations only target the first matching instance it finds. You must use explicit indices for precise, multi-instance targeting.
- No Batch Rollbacks: There is no transactional rollback during batch processing, any successful operations will persist even if a later action in the same batch fails. Use 'stop_on_error: true' and validate your inputs beforehand.
- Structure and Hierarchy Limits: The system only supports single-level lists and standard headings (H1-H3) during creation and content additions. Use specific named paragraph styles if you require deeper structural formatting.
- Concurrency and File Locking Throttles: Document reading is throttled to a maximum of 3 concurrent requests per file. Document writes are strictly serialized using a 40-second file lock. It is highly recommended to use 'batch update' instead of making multiple separate write calls.
- Legacy .doc Conversion Dependents: Auto-converting legacy .doc files requires an active LibreOffice binary backend and is subject to a strict 60-second timeout. Successful conversion results are cached on a per-session basis.
Cloud Presentation & Documentation Tools (Google Slides, Google Docs, MS PowerPoint 365 Online & MS Word 365 Online)
How to - Use Cloud Presentation & Documentation Tools
This segment provides you guidance on how to use the cloud presentation and documentation tools effectively using securely stored, reusable credentials without redundant folder path configurations.
Refer to the following sections to know more:
Integrate Cloud Tools in Conversational Agents Integrate Cloud Tools in Automation Agents Integrate Cloud Tools in Automated Workflows
1. Integrate Cloud Tools in Conversational Agents
The Cloud Presentation & Documentation Tools enable Conversational Agents to read, create, modify, or sync enterprise documents and decks directly within live user chat sessions.
Step 1: Securely Store Cloud Credentials
- Navigate to the Tools Module, connect your account and securely save your cloud service credentials (e.g., Google OAuth/Service Account keys or Microsoft OneDrive/SharePoint credentials).
Step 2: Add Cloud Capabilities to the Agent
- Go to your Conversation agent and navigate to the Tools section in the configuration panel.
- Click + Tool and search for the Google Docs, Google Slides, MS Word 365 Online, or MS PowerPoint 365 Online tools categories.
- Select your stored credentials from the global dropdown menu.
- Select all or specific capabilities your agent requires (such as Get Document Text, Create New Slide, or Refresh Linked Charts) from the action list.
Step 3: Run the Agent and Interact
- Launch your agent in the chat interface.
- Provide a contextual task parameter such as a Document ID, Presentation ID, or a Folder Path. The secret vault invisibly handles the login framework behind the scenes.
- For Reading/Analysis: Ask the agent to analyze a target cloud file (e.g., "Summarize the text inside Google Doc ID: 12345").
- For Editing/Generation: Prompt the agent to make cloud updates (e.g., "Append the action items to the end of my MS Word file" or "Find and replace the client placeholder text across my Google Slides deck").
Step 4: Access Your Output
- The agent will execute your changes live on the cloud or generate a link to your asset.
- Click the direct link returned in the chat window to view or download the modified files, or click the downstream PDF export link if applicable.
2. Integrate Cloud Tools in Automation Agents
Automation Agents use cloud tools to run persistent headless data processes, bulk template generations, and synchronized cross-platform updates without human intervention.
Perform the following steps to link cloud capabilities to an Automation Agent:
- Open your Automation Agent and navigate to the Tools Configuration panel.
- Click Add Tool and filter by the cloud suite name (Google or Microsoft 365).
- Assign the respective authentication profile from your Credential Vault dropdown.
- Select and attach the specific processing tools needed for your background processing job (e.g., Refresh Linked Charts, Create Doc from Template, or Merge Presentations).
- Specify the target Folder ID/Path inputs where the agent will catalog generated outputs.
3. Integrate Cloud Tools in Automated Workflows
Workflows allow you to build automated step-by-step document pipelines on a visual canvas using two different node configurations:
Method 1: Using a Standalone Node
- Open your workflow canvas and locate the node library.
- Drag and drop the dedicated cloud suite node onto the canvas
- Click the node to open its configuration panel, select your credential profile, and pick a single action (e.g., Refresh Linked Charts, Share Document) from the dropdown list.
- Define your structural task inputs (e.g., passing a Document ID or Folder ID array string) to target the file execution.
Method 2: Using an Agent Node
- Drag an Agent Node onto your workflow canvas.
- In the node settings, select an existing Automation Agent that already has cloud tools and vault connections configured.
- This allows the workflow to delegate multi-step, complex live platform syncing routines directly to a specialized sub-agent.