This section provides comprehensive, step-by-step instructions for configuring and using tools from the Tools module.
How to Use the Tool Directory
This guide explains how to browse and view details for the ready-made tools available in the Tools directory. This directory serves as a catalog of available capabilities and their required configurations.
Follow these steps to browse the Tool Directory:
Navigate to Purple Fabric → Tools to open the Tools interface. The Directory view is presented by default.
Browse available prebuilt tools on the Directory page
You can search for a specific tool or browse by category.
Click on any tool card to open a detailed view. In this view, you can review its features across three tabs: Details: This panel serves as the primary source of information for a tool, providing developers with a comprehensive guide to its purpose, prerequisites, and configuration. Operations: This panel lists all the available actions the tool can perform, along with a description of the actions. Accounts: This panel lists the pre-configured accounts that are available to be used for this tool's authentication.
How to Build a Custom Function
Custom Functions allow you to define reusable, business-specific logic. Follow these steps to create, test, and publish a Custom Function.
In Custom Functions, please be aware that all previously available tools configured in your Agents will continue to be supported and are available for use alongside any Custom Functions you create.
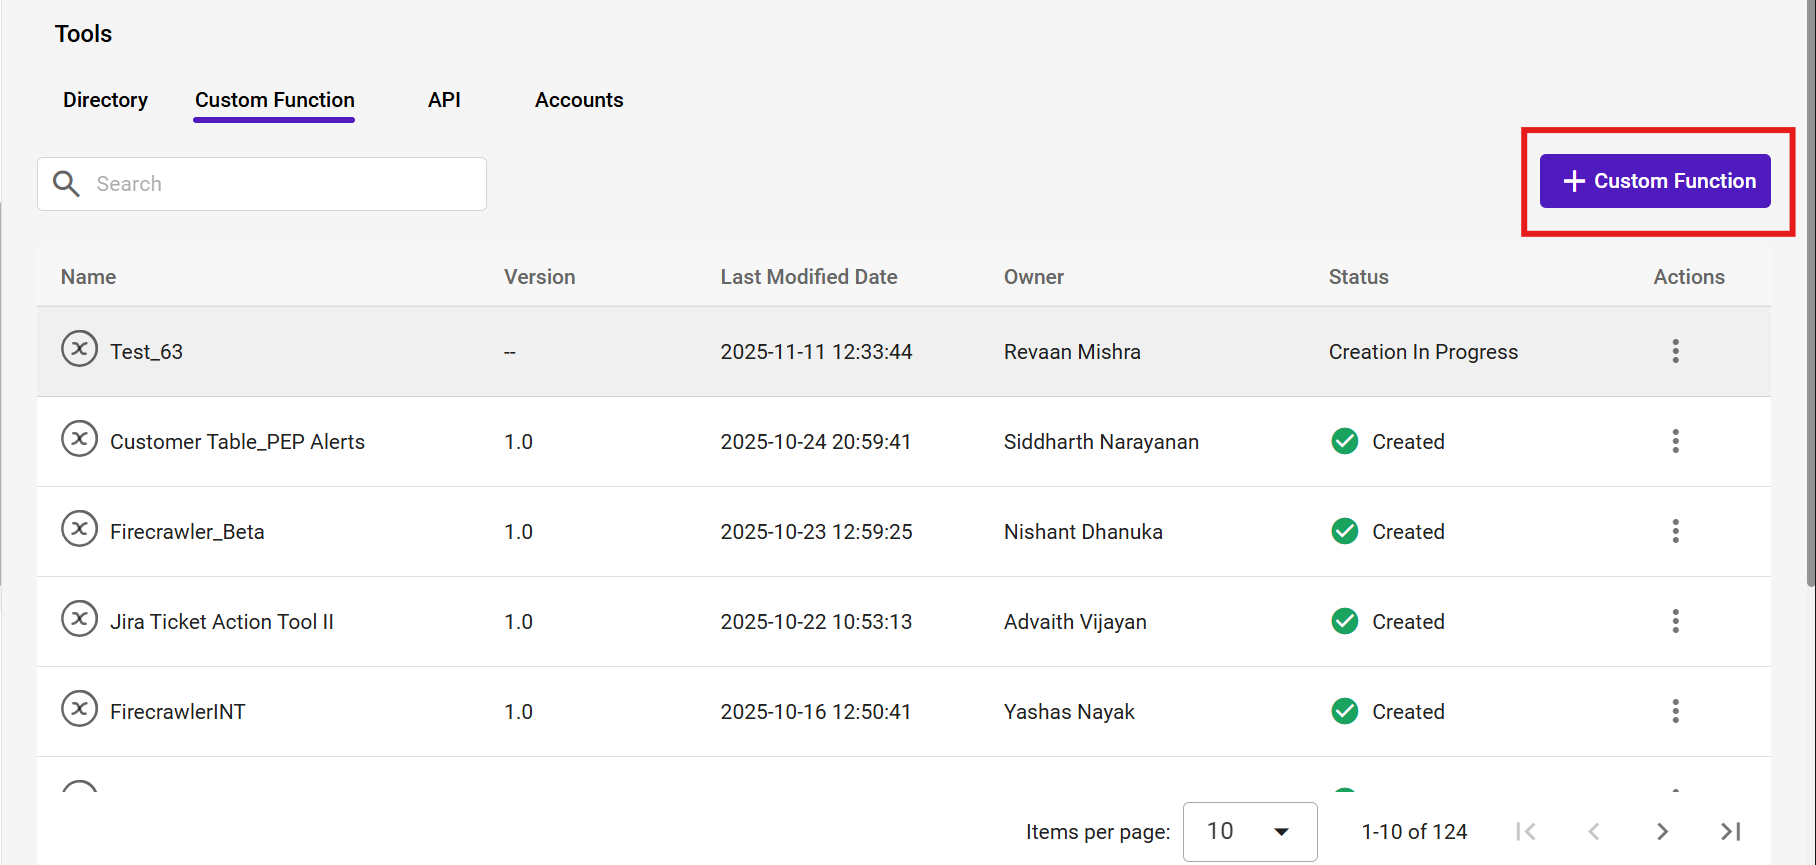
Step 1: Navigate to Custom Functions
From the Purple Fabric interface, navigate to Tools.
Select the Custom Function tab from the left sidebar
Click + Custom Function to open the function builder
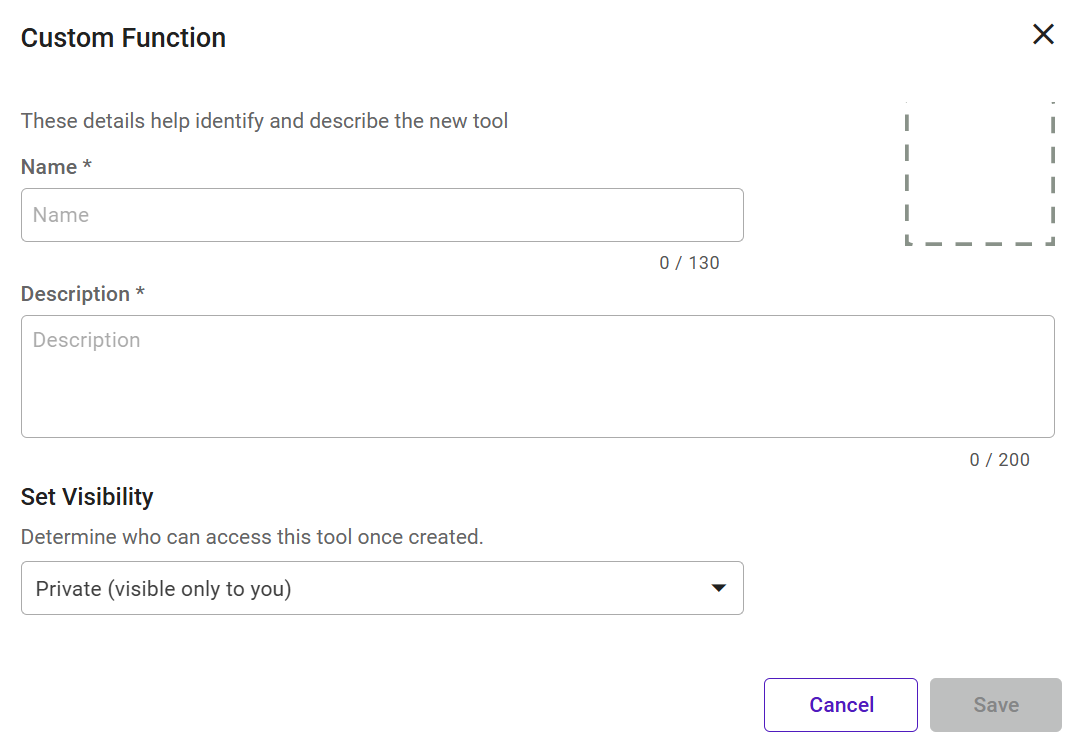
Step 2: Configure Function Metadata
In the configuration panel on the right side of the screen, provide the following metadata:
Field
Description
Function Name
A unique and descriptive name for your custom function
Description
A brief explanation of what the function does
Visibility
Choose between Private (visible only to you) or Public (visible to everyone in your workspace).
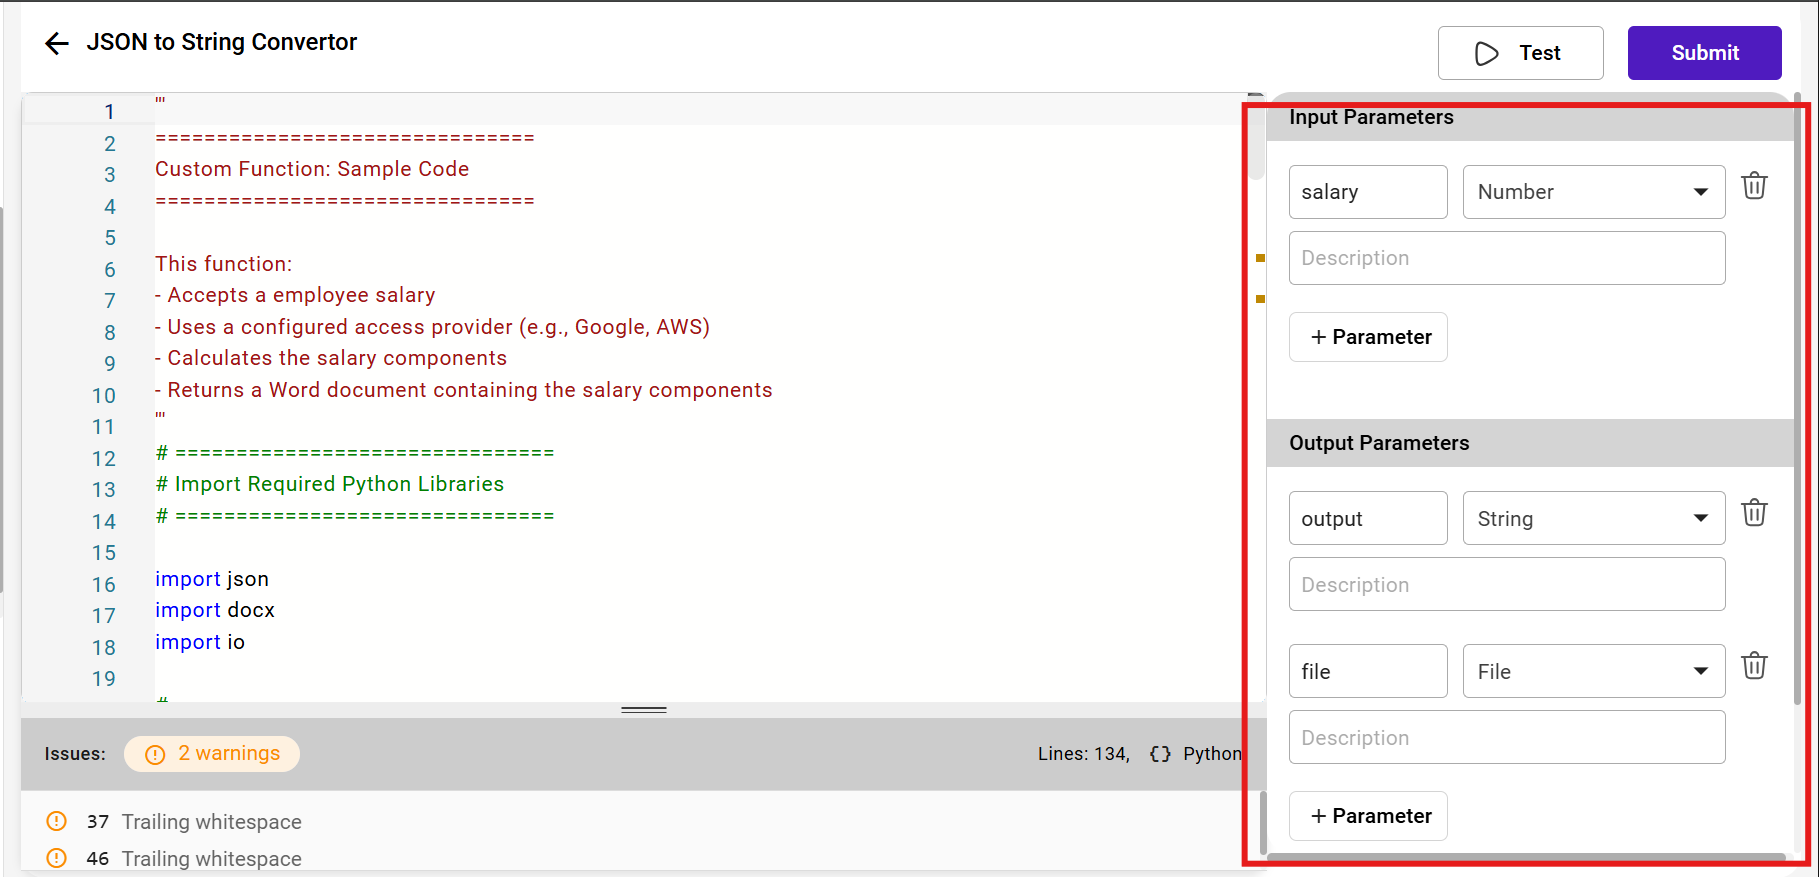
Step 3: Define Input Parameters
Input Parameters define the data your function will accept when executed.
In the Input Parameters section, click + Parameter.
For each parameter, provide: Parameter Name: A meaningful identifier (e.g., salary). Data Type: Select from available types such as Number, String, Boolean, or File. Description: (Optional) A brief explanation of the parameter's purpose.
Step 4: Define Output Parameters
Output Parameters define the structure of the data your function will return after execution.
In the Output Parameters section, click + Parameter
For each output, provide: Parameter Name: A meaningful identifier (e.g., output, file). Data Type: Select from String, Number, File, Boolean, etc. Description: (Optional) A brief explanation of what this output contains.
Step 5: Add Access Providers (Optional)
If your function requires authentication to external services (e.g., Google, AWS, database connections), link an Access Provider.
In the Access Providers section, click + Access
Select a pre-configured credential from the dropdown (e.g., "Google Service", "AWS Service").
These credentials can be accessed in your code using context.get_access_details('credential_name').
Step 6: Write Your Custom Function Logic
In the code editor on the left side of the screen, write your business logic inside the main(inputs, context) function. inputs: An object containing values from the Input Parameters you defined. Access them using inputs.parameter_name. context: An object providing utilities for logging, file handling, and credential access. return: A dictionary containing the output values. The keys in this dictionary must exactly match the Parameter Names you defined in the Output Parameters. Available Python Libraries
Custom Functions support a curated set of Python libraries for data processing, cloud integration, and business logic implementation. These libraries are pre-installed and ready to use, simply import them using standard Python syntax at the beginning of your function code (e.g., import pandas as pd). Supported Libraries
The following table lists all available Python packages:
Package Name
Version
Use Case
numpy
1.26.4
Numerical computing and array operations
pandas
2.2.3
Data manipulation and tabular analysis
boto3
1.35.77
AWS service integration (S3, Lambda, etc.)
secure-smtplib
0.1.1
Secure email transmission
beautifulsoup4
4.13.4
HTML/XML parsing and web scraping
wikipedia
1.4.0
Wikipedia content retrieval
langgraph
0.1.5
Language model workflow orchestration
google-api-python-client
2.123.0
Google API integrations
matplotlib
3.8.4
Data visualization and charting
psycopg2-binary
2.9.9
PostgreSQL database connectivity
plotly
5.22.0
Interactive data visualization
kaleido
0.2.1
Static image export for Plotly charts
PyMySQL
1.1.1
MySQL database operations
pyodbc
5.1.0
ODBC-compliant database connections
snowflake-connector-python
3.15.0
Snowflake data warehouse integration
duckduckgo-search
6.2.9
Web search capabilities
tabulate
0.9.0
Pretty-print tabular data
certifi
2025.4.26
SSL certificate bundle
python-docx
1.2.0
Microsoft Word document processing
openpyxl
3.1.5
Excel file read/write operations
Handling Outputs
The function's return statement is a Python dictionary. The keys in this dictionary must exactly match the Parameter Names you configured in the Output Parameters section.
For simple data types (String, Number,Boolean): Assign the value directly.
For File types:
Generate your file's content in memory as bytes.
Upload it using context.upload_file(file_name, content_bytes), which returns a file reference object or the address of the object.
Assign this file reference object to the appropriate key in your return dictionary.
Step 7: Test Your Function
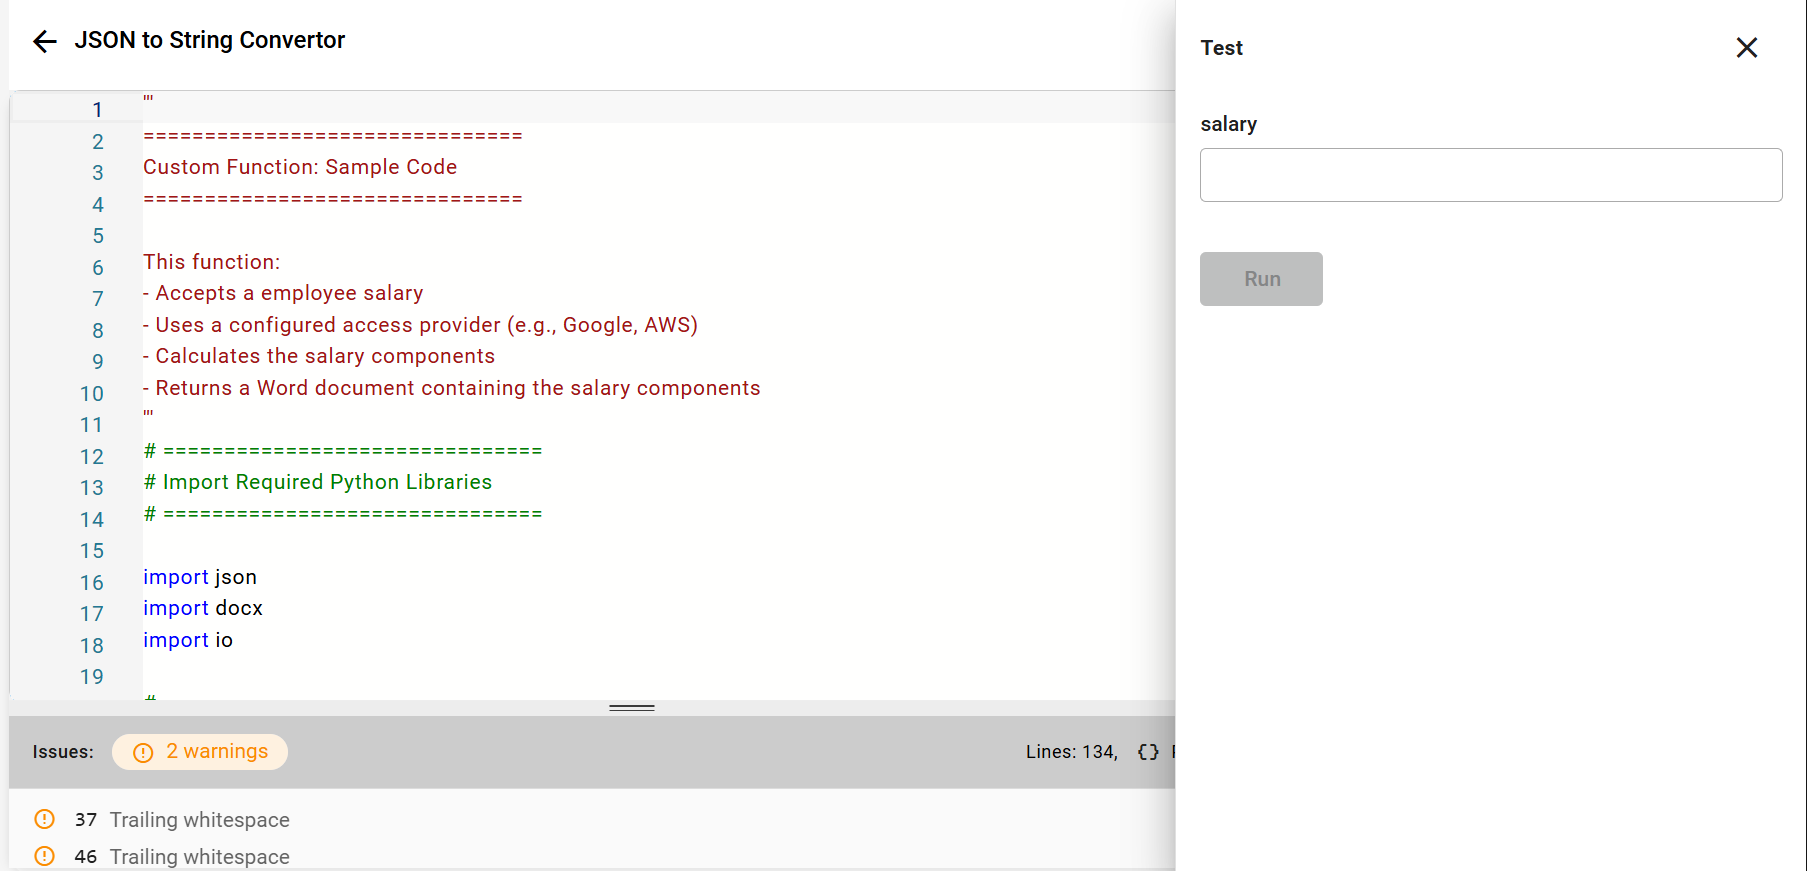
Click the Test button in the top-right corner of the screen.
In the test panel that appears, provide sample values for each required Input Parameter.
Click Run to execute your function.
Review the console output and verify that:
The function executes without errors.
The returned output matches your expected Output Parameters.
Log messages appear as expected.
Step 8: Submit and Publish
Once testing is complete and you're satisfied with the function's behavior, click Submit in the top-right corner.
The system will validate your code and configuration.
Upon successful validation, your Custom Function will be published and become available for use in:
Automated Workflows
Team of Agents
How to Create a New API Tool
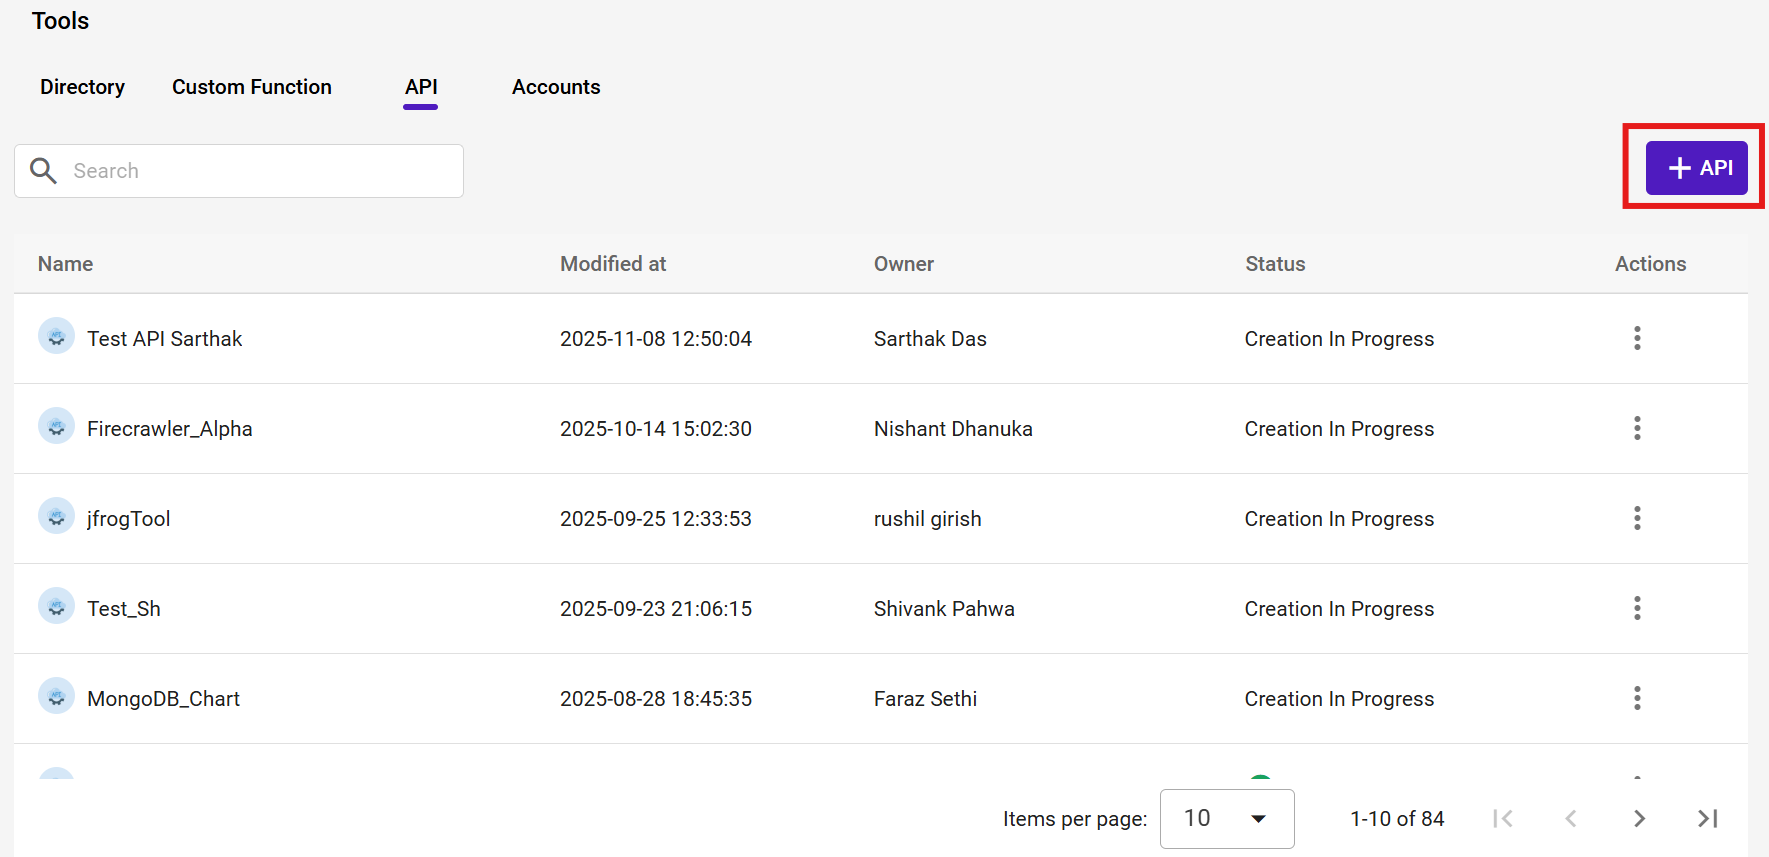
This section walks you through the process of creating a custom API tool using the Tools module. These tools can be used in Team Of Agents.
Select "API": After clicking Create Tool, choose the API option.
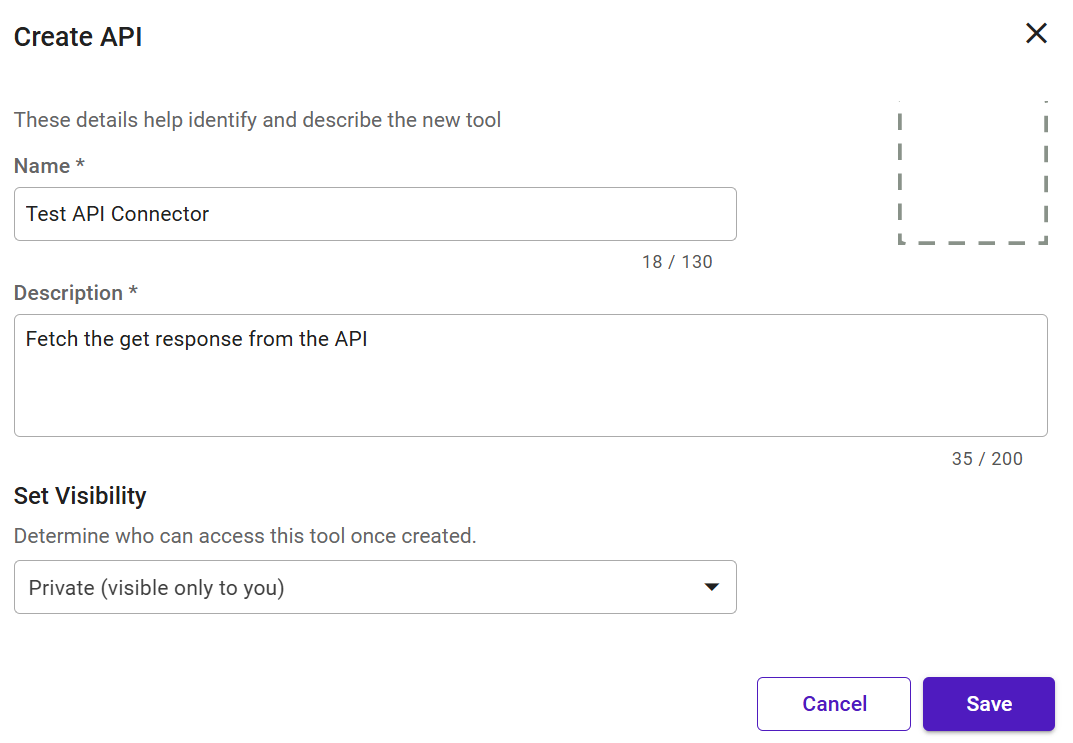
Enter Tool Details: Provide a Name and Description for your API tool.
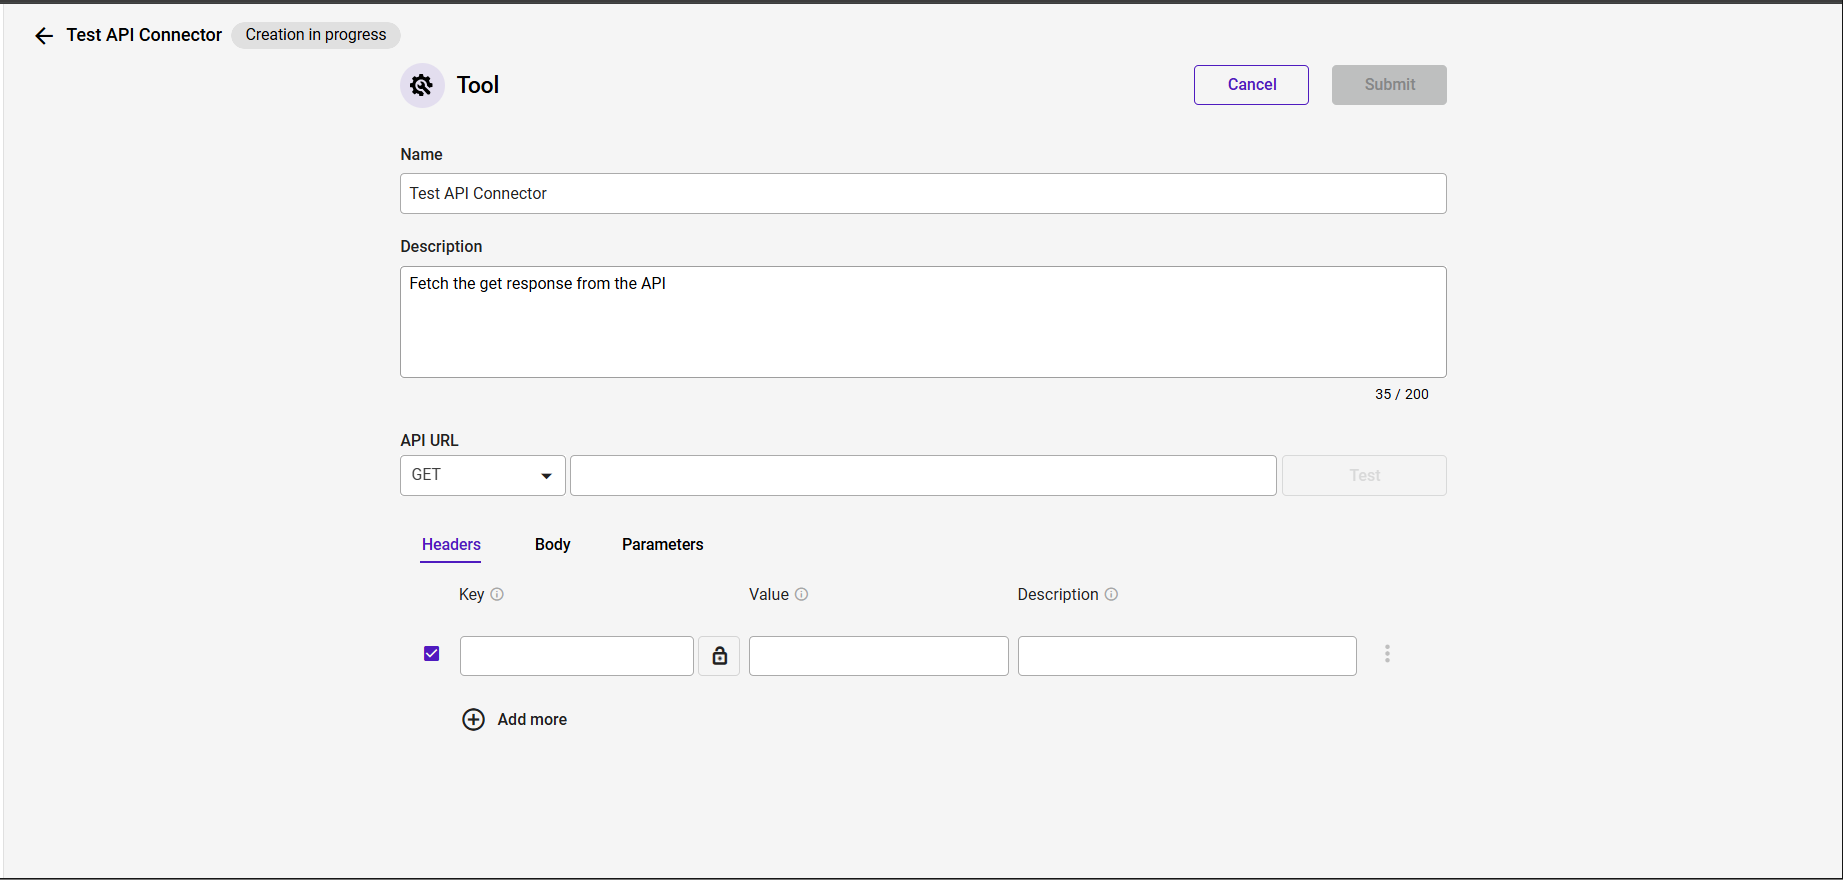
Configure API Details: API URL: Enter the complete endpoint URL. HTTP Method: Select the appropriate HTTP method (e.g., GET, POST) from the dropdown. Configure requestHeaders tab:
Add header rows as needed:
Key: e.g., Authorization, key, Content-Type
Value: Enter the token or value (use the secure/locked field for secrets)
Description: Optional note
Body tab
Body type:
None: No body is sent
JSON: Paste/compose the JSON payload
form-data: Add rows:
Key: field name
Type: Text/File
Value: enter text or choose a file field
Description: optional notes
Parameters tab
Add URL query parameters:
Key: e.g., key, appid, q
Value: e.g., your_api_key or a sample token
Description: optional notes
Test: Click the Test button to validate your configuration and ensure the API call is successful.
Submit: Once satisfied with the test results, click Submit to create and save your API tool.
How to Create and Manage an Account
Follow these steps to create a secure, reusable account for authenticating with external services.
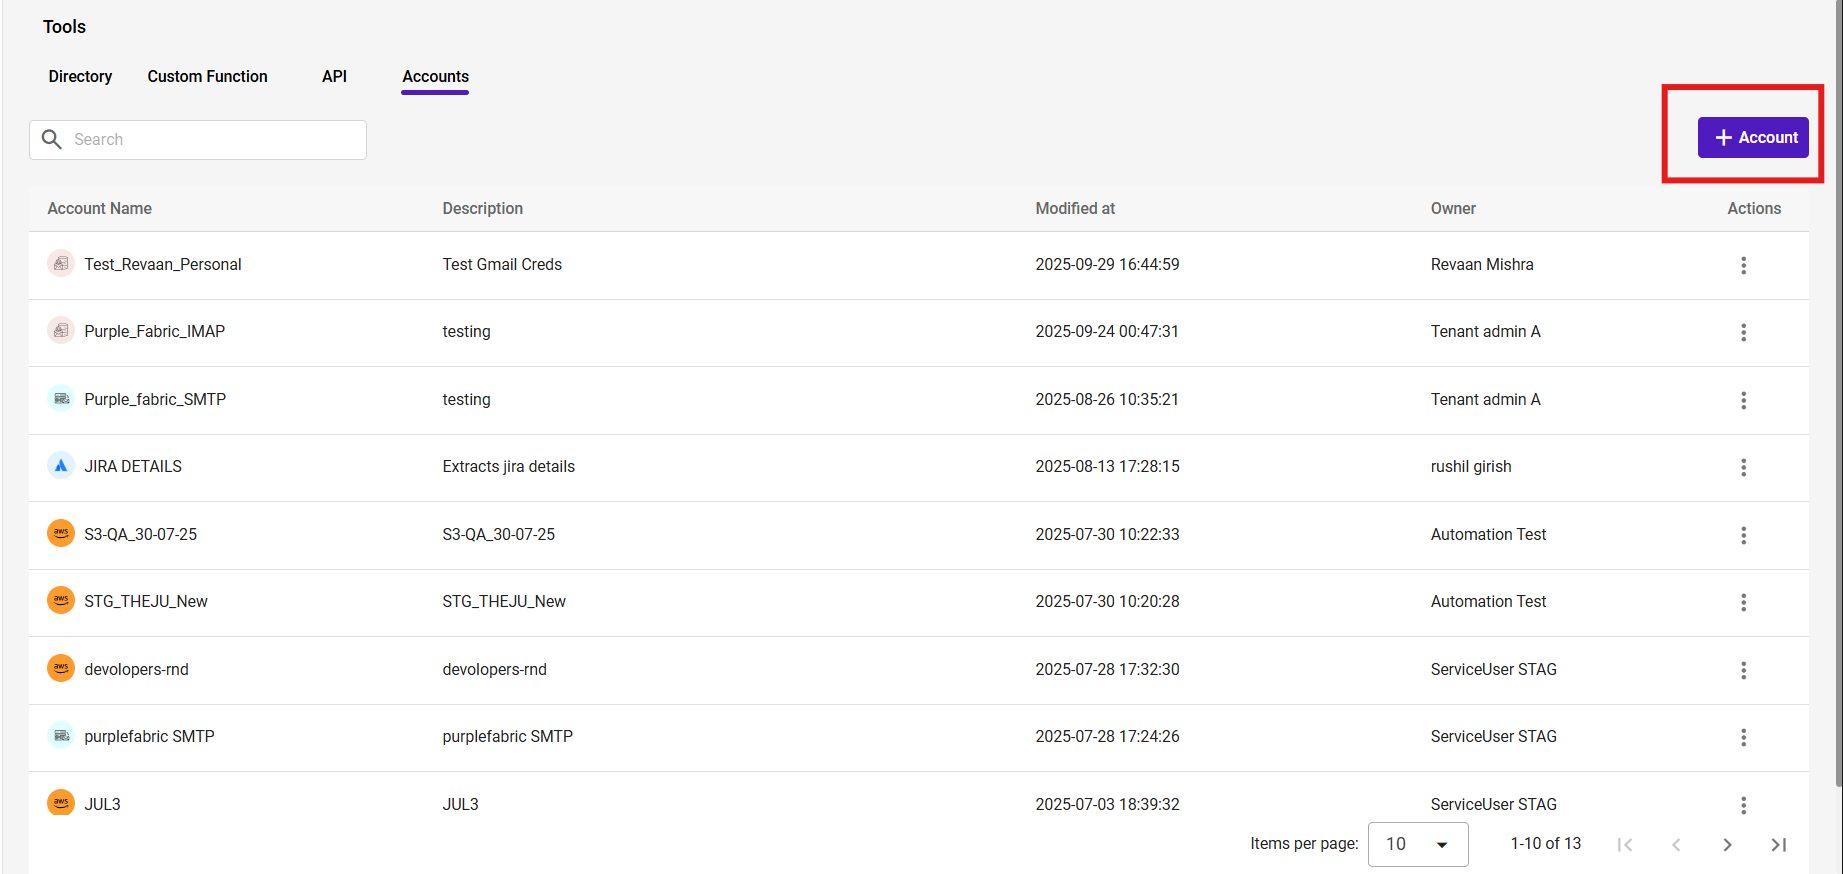
Step 1: Navigate to the Accounts Tab
From the Purple Fabric main interface, navigate to Tools and select the Accounts tab. This will display a list of all existing accounts in your workspace.
Step 2: Select a Service
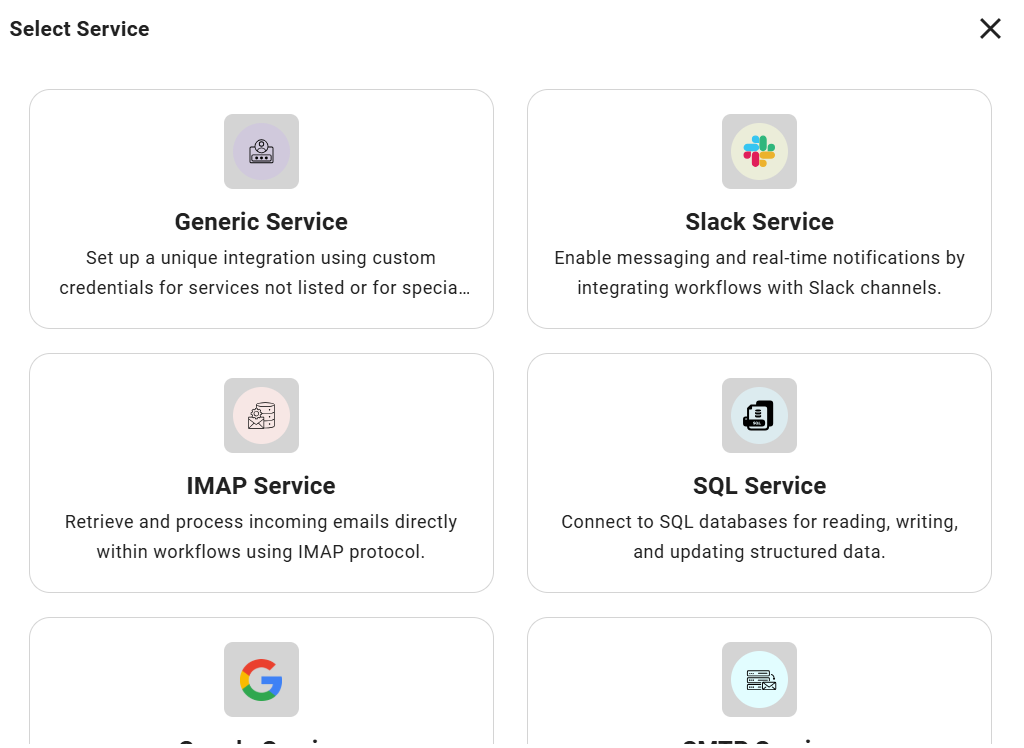
Click the + Account button in the top right corner. A Select Service dialog will appear.
Choose the service you wish to connect to (e.g., IMAP Service, Amazon Web Service, Google Service).
Step 3: Provide Basic Information
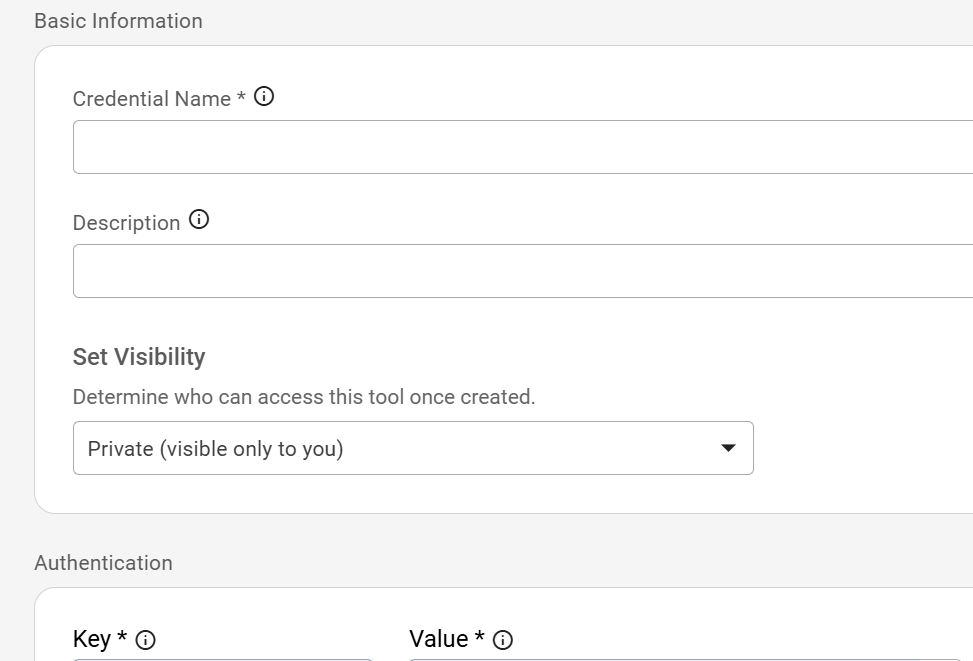
In the creation form that appears, fill in the "Basic Information" section:
Credential Name: A unique and descriptive name for this account.
Description: A brief summary of the account's purpose.
Set Visibility: Choose between Private (visible only to you) or Public (visible to everyone in your workspace).
Step 4: Provide Authentication Details
In the "Authentication" section, enter the specific credentials required by the selected service. For an IMAP service, this would include:
Email Address
APP Password
IMAP Host
Step 5: Submit and Verify
Click Submit to save the new account. It will now appear in the list on the Accounts tab.
You can search for existing accounts using the search bar and manage them via the Actions menu.
Managing Connectivity and Reauthentication
Once an account is linked to a tool or agent, the platform actively monitors its connection status across the agents, workflows and the modules. Use the following features to ensure your tasks remains uninterrupted.
1. Automatic Token Refresh (Self-Healing)
For services using OAuth (such as Google, Gmail, etc.), the system includes a self-healing mechanism. It will automatically attempt to refresh access tokens in the background before they expire. This ensures that your agents can continue accessing external tools without requiring you to manually log in repeatedly.
2. Monitoring Connection Status
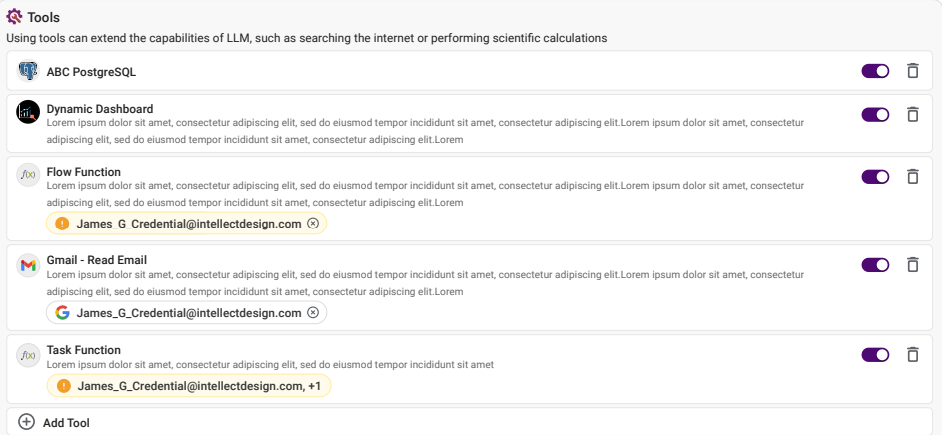
You can view the health of your tool connections directly within the Agent Configuration in Tools panel:
Active (Toggle On): The credential is valid and the tool is ready for use
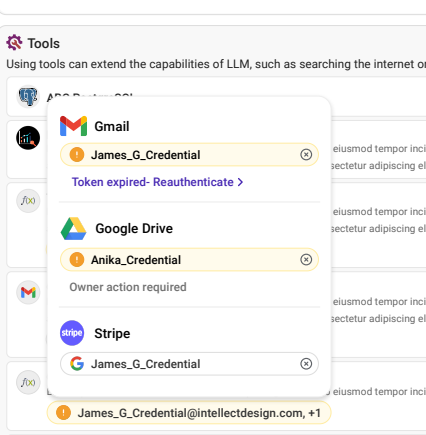
Token Expired Alert: If a token cannot be refreshed automatically, an orange warning icon will appear next to the credential name
3. Reauthenticating Expired Credentials
If a connection is interrupted due to an expired or revoked token, you can restore it directly from the tools section:
Manual Fix: Click Token expired - Reauthenticate > is tool’s credential settings. This will launch the external service's login screen to securely grant new permissions.
Unified Fix: If multiple tools use the same account, reauthenticating once will automatically fix the connection for all associated tools across your workspace.
4. Handling Locked Credentials
To maintain security, reauthentication permissions are based on ownership:
Owned Credentials: You can freely reauthenticate accounts you created.
Shared/Admin Credentials: If a credential is marked "Owner action required," it has been locked by the original creator or an admin. In this case, you cannot initiate the reauthentication flow yourself and must contact the asset owner to refresh the connection.
5. Error Feedback in Testing
When testing an agent in the Test and Debug panel, the system provides specific feedback if a tool fails due to authentication:
Execution Interrupted: The agent will perform a "graceful halt" to prevent data errors.
Detailed Trace: The debug sidebar will display a "Credentials Expired" card, identifying exactly which tool requires attention so you can resolve the issue without guessing which connection failed.
How to Configure Tool Schemas in an Agent
This section explains how to view and understand the technical requirements of the tools you add to your agents. Detailed schemas allow you to see exactly what information a tool needs (Inputs) and what information it provides back (Outputs).
Step 1: Add a Tool to Your Agent
Open an existing agent or create a new one from Purple Fabric → Agents
In the tool directory, click Add next to the desired tool (e.g., Jira - Create). The tool will now appear in the Tools section of your agent configuration
Step 2: Access the Tool Schema
Locate the tool in the Tools panel on the main configuration screen
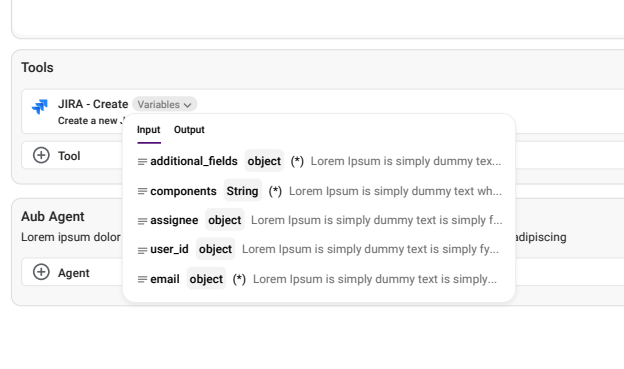
Click the Variables dropdown or hover over the tool name to trigger the schema overlay
The schema window will appear, displaying two primary tabs: Input and Output
Step 3: Review Input Parameters
The Input tab defines what the agent must send to the tool.
Required Fields (): Any parameter marked with an asterisk () is mandatory. The agent cannot execute the tool without this data
Data Types: Each field specifies its expected format (e.g., string, object, boolean, array)
Field Description: Read the inline description to understand the purpose of the field (e.g., assignee - the user ID the task is assigned to)
Step 4: Review Output Parameters
Click the Output tab to see what data the tool returns after a successful run.
Understanding the output schema is critical if you want the agent to use specific data points (like an issue_id or status) in its final response to a user
This view shows the structure of the JSON object the agent will receive back from the tool
Step 5: Define Parameter Values
You can choose how these parameters are filled during an interaction:
Manual Configuration: You can hard-code specific values directly in the UI if the parameter should always be the same
Dynamic Prompting: If left blank, the LLM will use the user's query and the field descriptions in the schema to "fill in the blanks" dynamically during the conversation
If you are using a Custom Function, the parameters shown here are the exact Input and Output parameters you defined during the function creation process.
How to configure OAuth & Key based Setup for Microsoft Connectors
Step-by-step guide to configure OAuth 2.0 (Delegated permissions) & Key Based (Application permission) for Microsoft Connector integration.
Important: Microsoft 365 Online connectors only work with Work or School accounts. Personal Microsoft accounts are not supported for this integration. This guide uses Delegated permissions only, meaning all API calls are made on behalf of a signed-in user.
Introduction
This guide walks you through the complete process of setting up OAuth 2.0 & Key based authentication for accessing Online Microsoft 365 Services via all the Microsoft connectors.
By the end of this guide, you will have:
A registered Azure application in Microsoft Entra ID (formerly Azure Active Directory) with Multi-tenant support
Properly configured Delegated & Application API permissions/Scopes for Connector operations
Redirect URIs set up for your application
A client secret for authentication
Verified cross-tenant configuration
After completing these steps, you can perform OAuth operations with the user's Work or School account.
Prerequisites
Before you begin, ensure you have the following:
Requirement
Details
Azure Account
An active Microsoft Azure subscription
Azure AD Role
Global Administrator, Application Administrator, or Cloud Application Administrator
Microsoft 365 License
A valid M365 license
Work or School Account
A Microsoft Work or School account (personal accounts are not supported)
Important:
If you do not have an Azure account, create one at https://azure.microsoft.com before proceeding.
From the left-hand navigation, expand Identity and select Applications
Step 2 - Register a New Azure Application
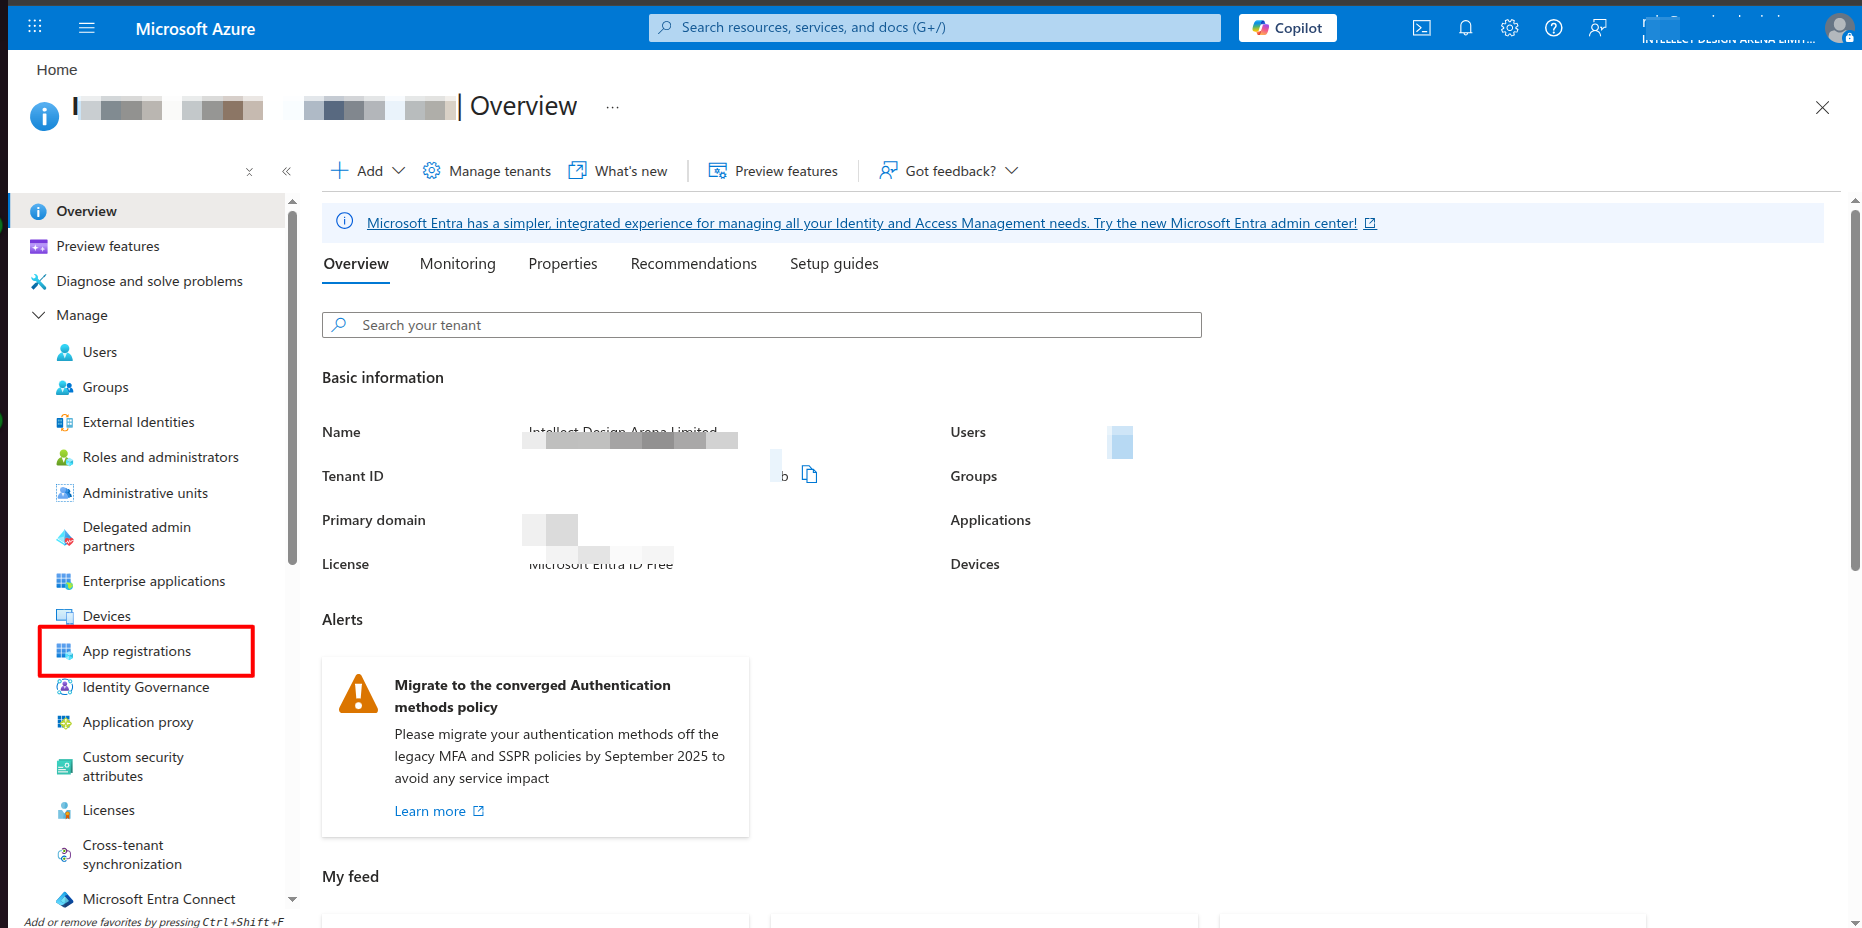
Navigate to App Registrations
In the Entra admin center, go to Identity -> Applications -> App registrations
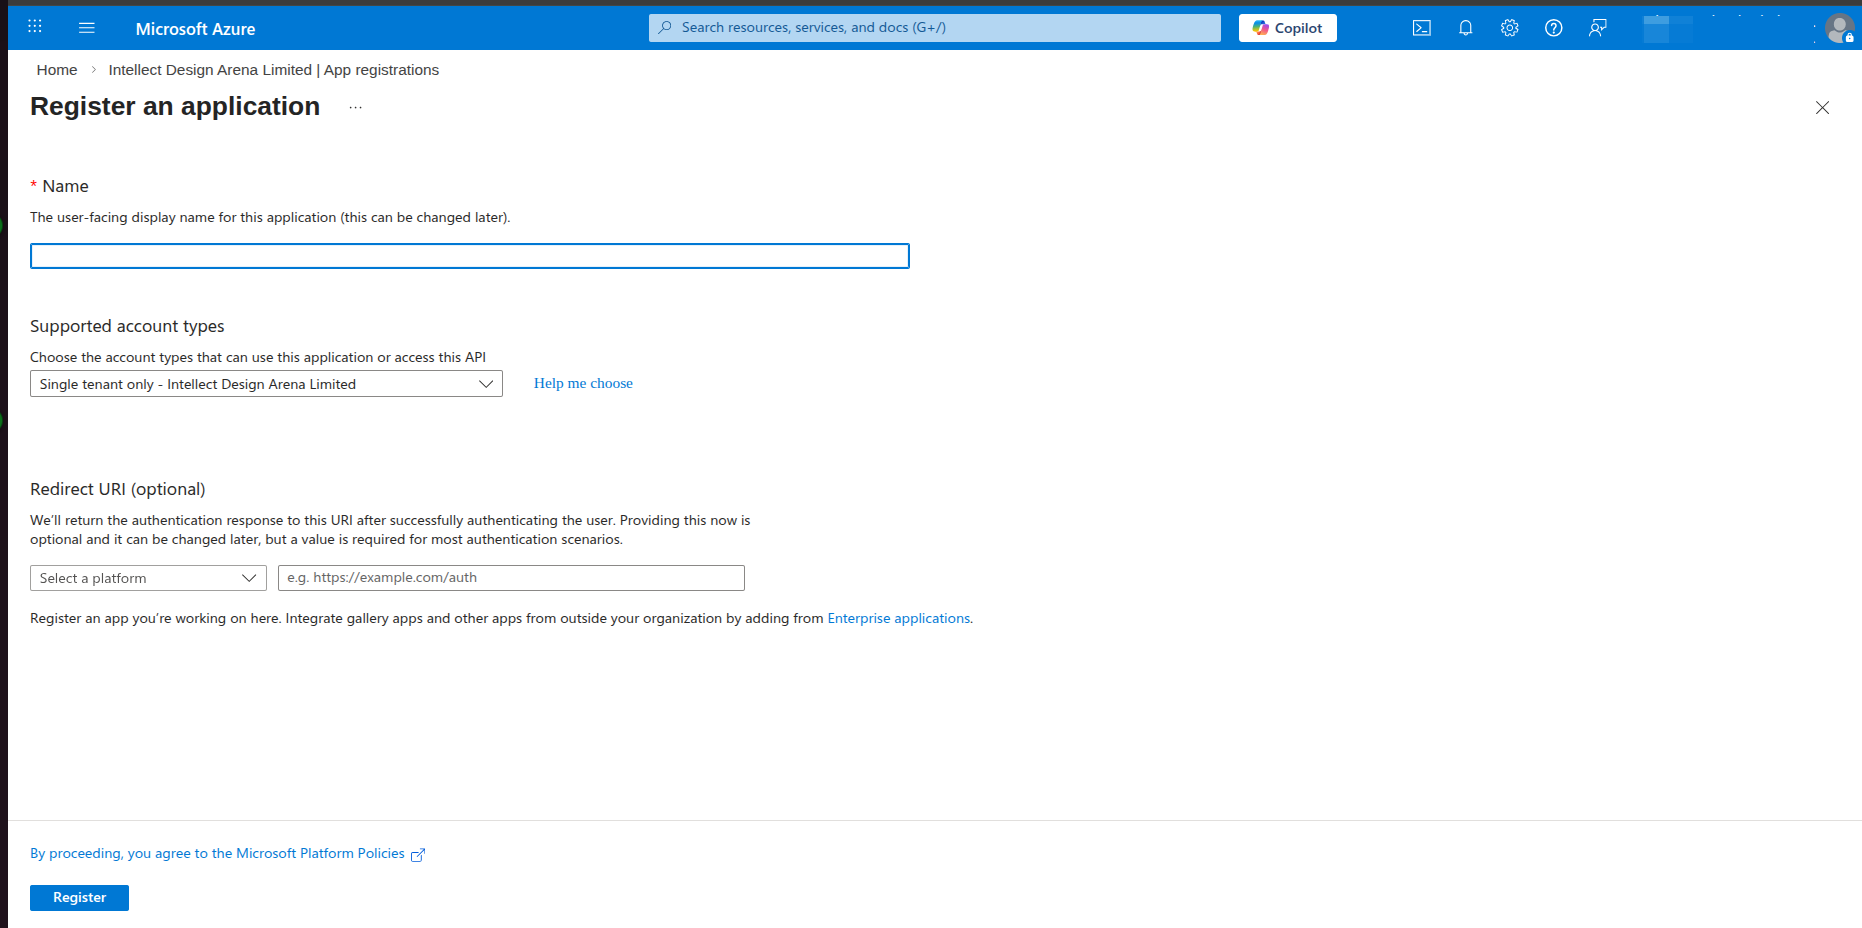
Click + New registration at the top of the page
Fill in Application Details
Field
Value
Name
Enter a descriptive name (e.g., M365-Excel-Integration)
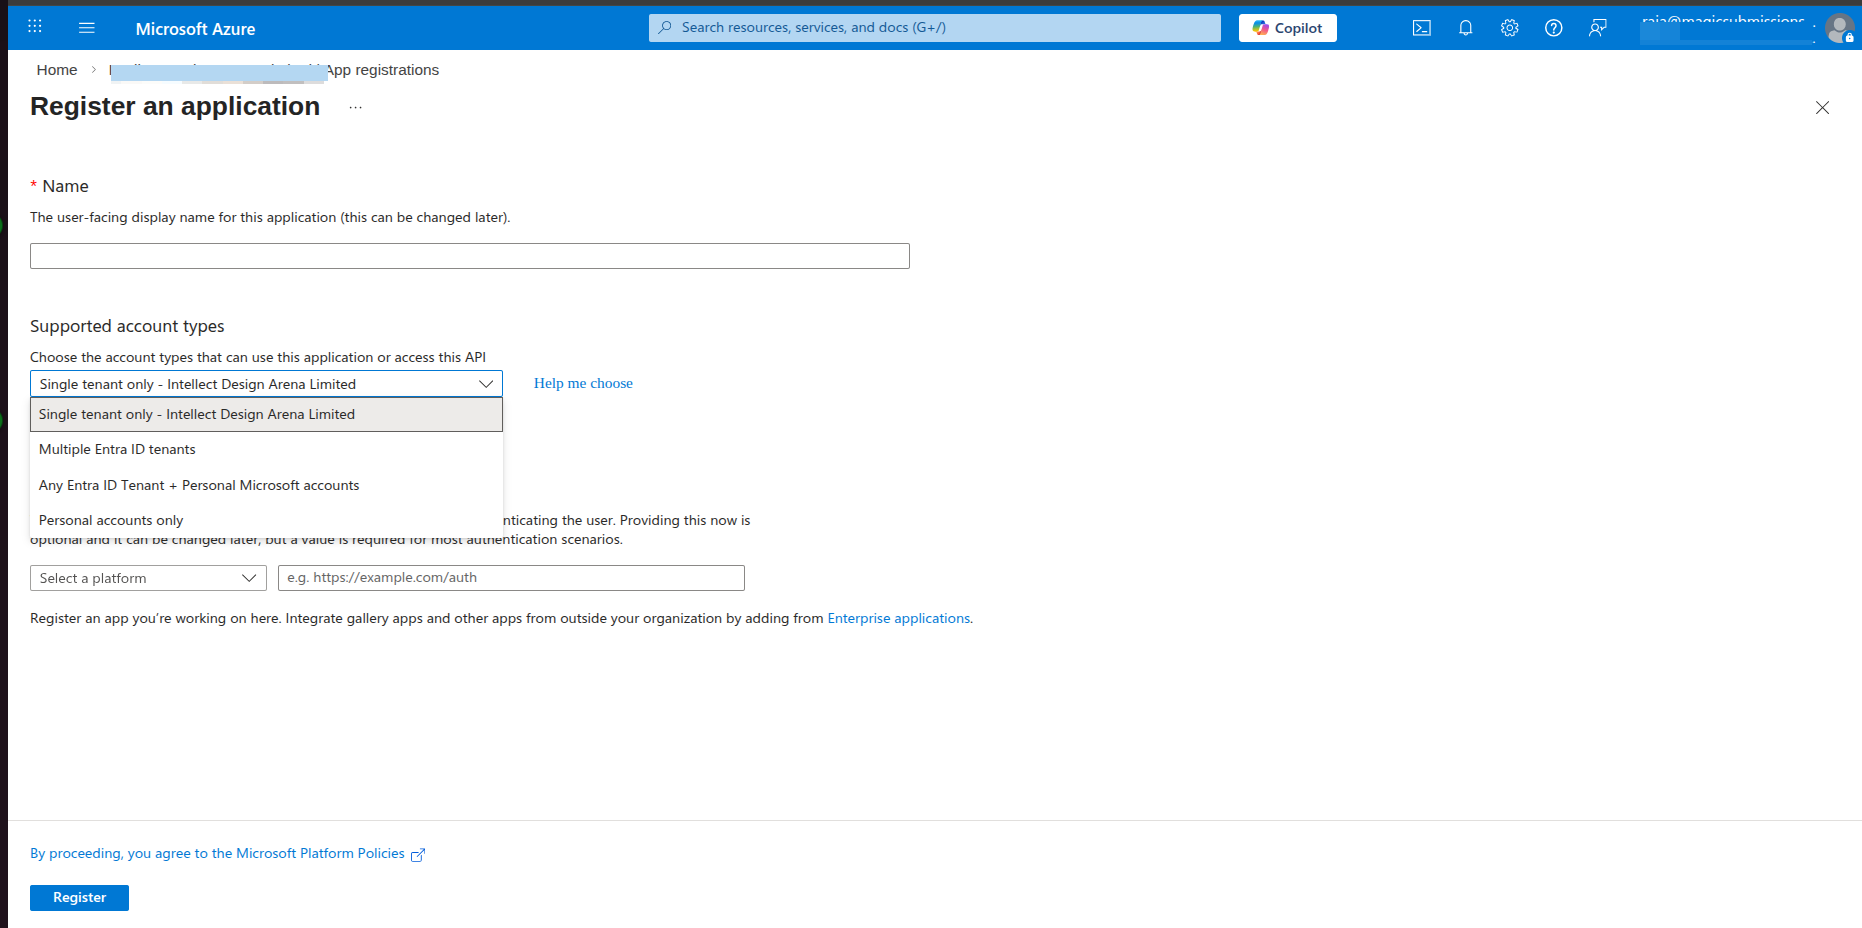
Supported account types
Select "Accounts in any organizational directory" (Multi-tenant)
Redirect URI
You can add your redirect URI here during registration, or add/modify it later in Step 4
Important:You must select the Multi-tenant option ("Accounts in any organizational directory") during registration to enable cross-tenant access. This is required for the connector to work across organizations.
Click Register.
Note Down Key Values
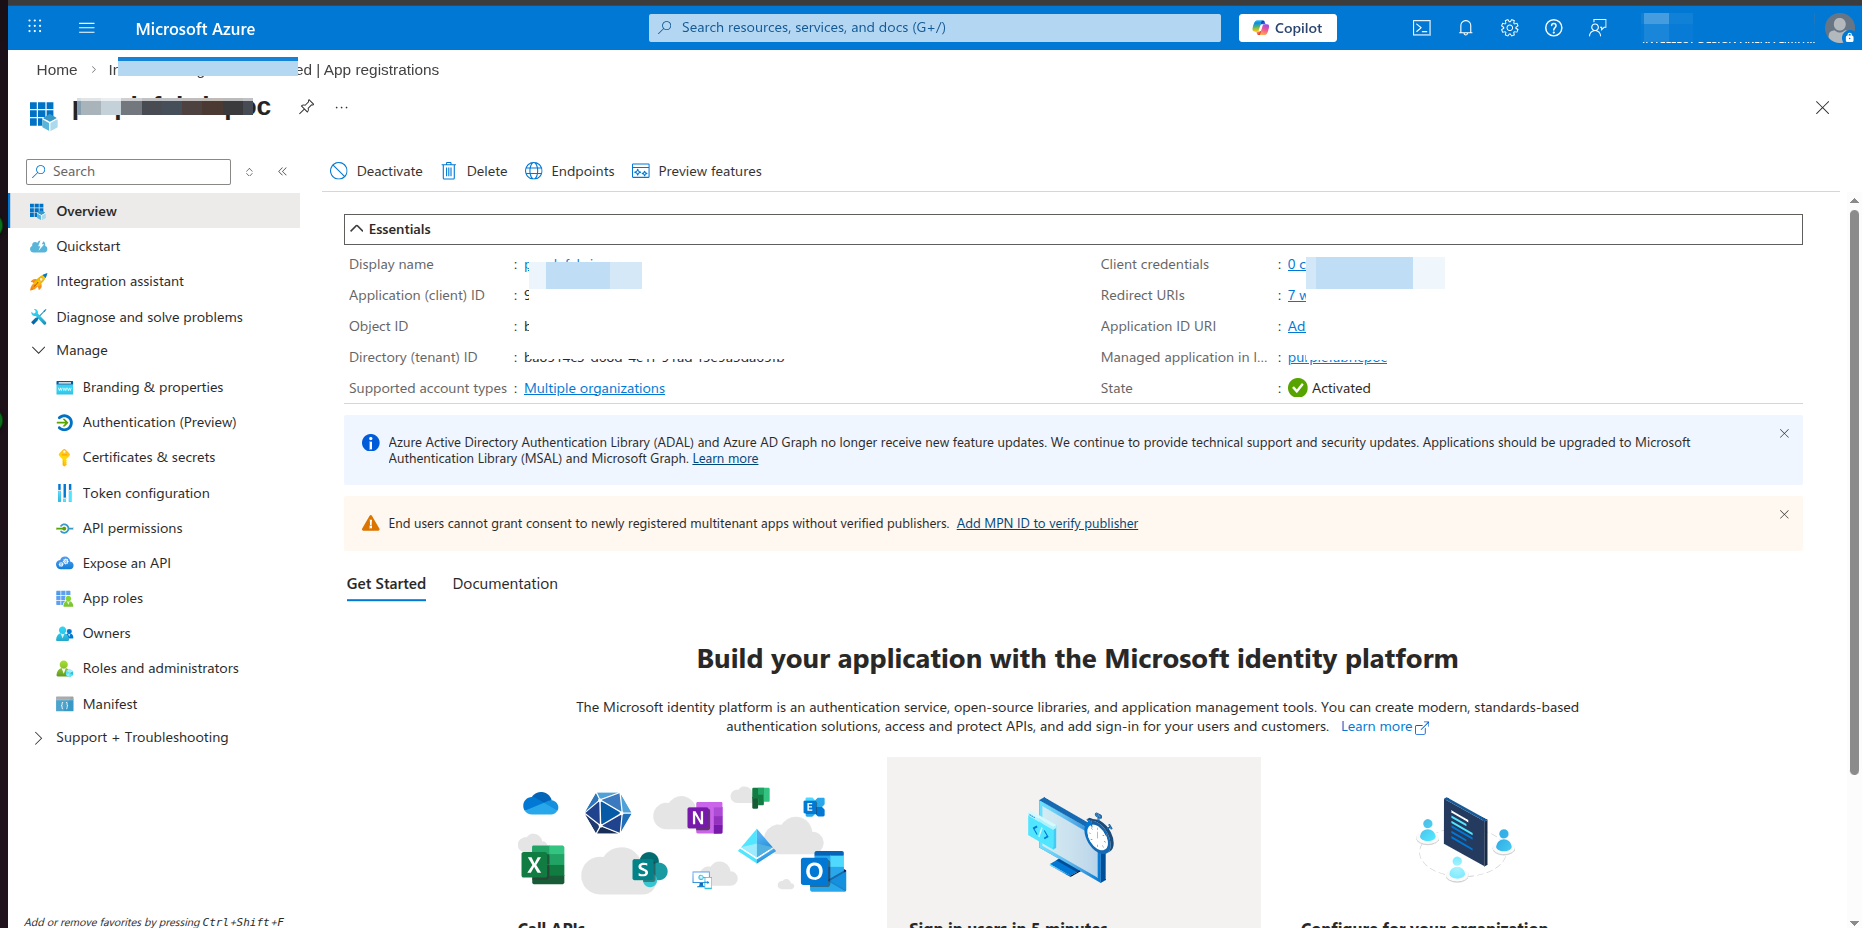
After registration, you will be taken to the application's Overview page. Record the following values:
Value
Where to Find
Application (client) ID
Overview page
Directory (tenant) ID
Overview page
Step 3 - Configure API Permissions (Delegated and Application Scopes)
Add Microsoft Graph Delegated and Application Permissions
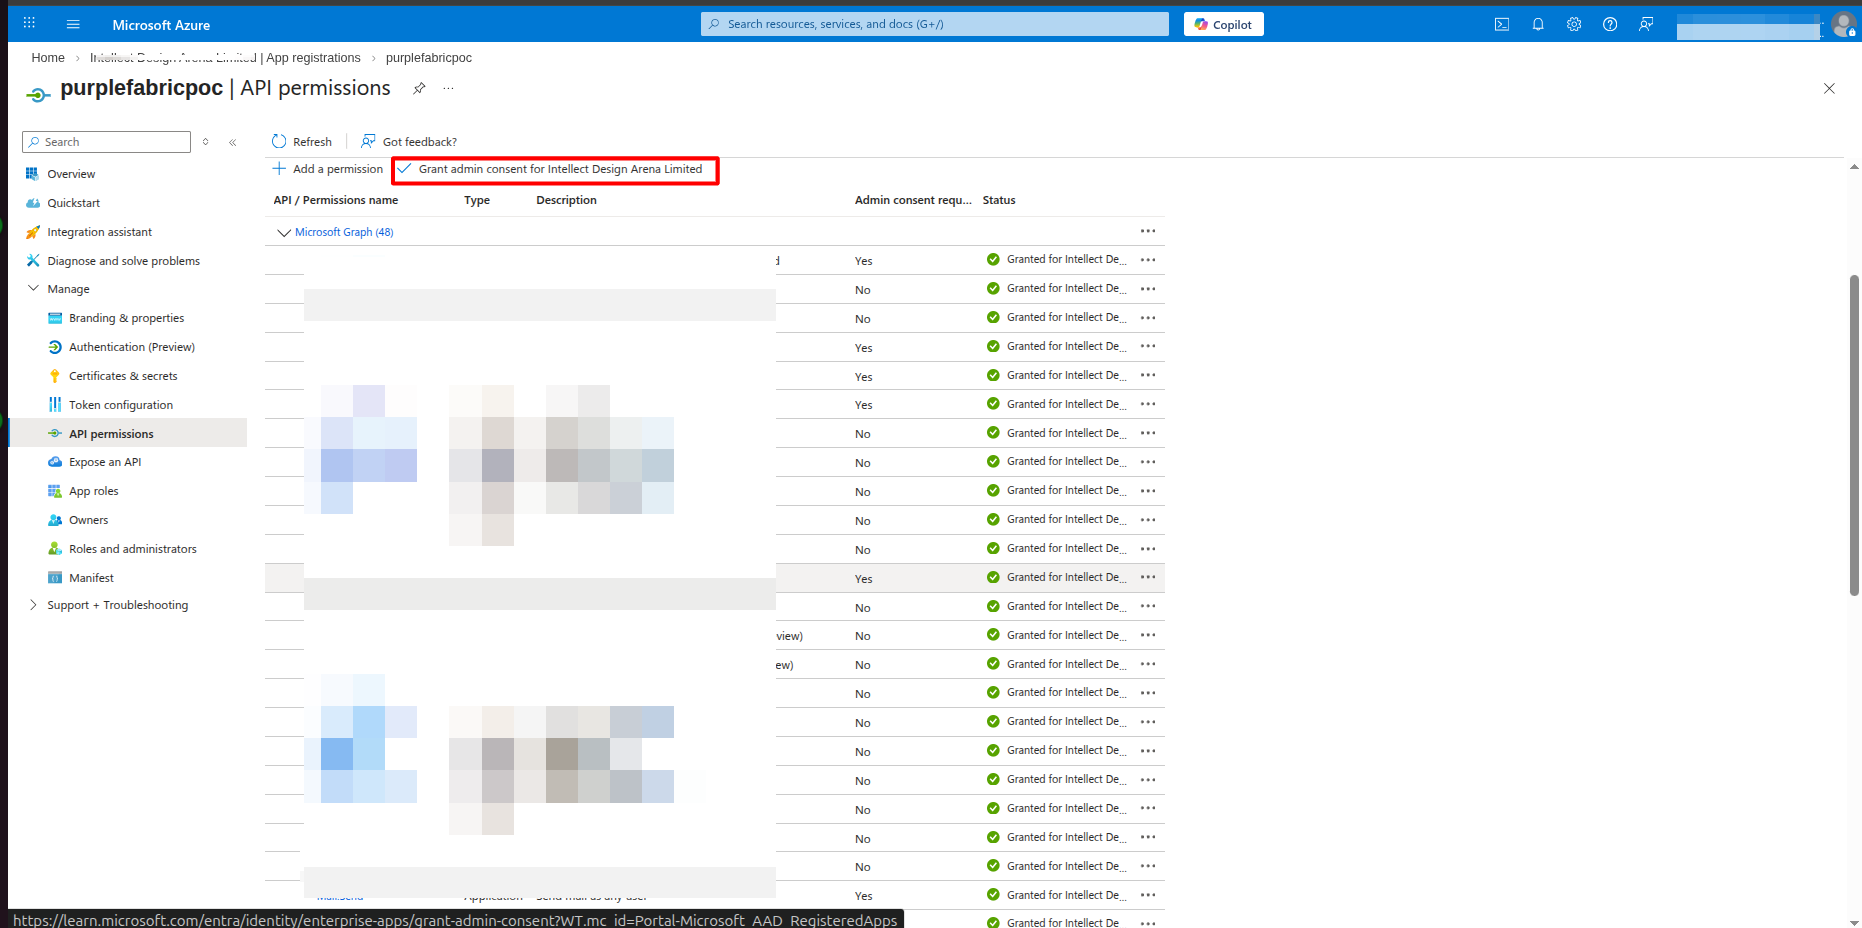
In your application page, select API permissions from the left menu
Click + Add a permission
Select Microsoft Graph
Choose Delegated permissions (this is required - all API calls are made on behalf of a signed-in user Oauth )
Choose Application Permissions (Add the required scopes - This is for Key based Authentication.)
Required Delegated & Application Permissions (Scopes)
Add the relevant scopes under Microsoft Graph:
Permission
Description
openid
Enables OpenID Connect sign-in
profile
Access the user's basic profile information
email
Access the user's email address
User.Read
Sign in and read the user's profile
Files.Read
Read the user's files
Files.ReadWrite
Read and write the user's files
offline_access
Maintain access via refresh tokens (required for token refresh)
All permissions listed above are sample Scopes, Based on the Microsoft Service update the relevant Scopes for Delegated and Application Permissions.
After selecting the required permissions, click Add permissions
Grant Admin Consent
Back on the API permissions page, click Grant admin consent for your Organization.
Confirm by clicking 'Yes'
The status column should now show a green checkmark with "Granted for [Your Organization]" for each permission
Important:Admin consent is required for some Delegated permissions & Application Scopes. Without it, users will see a consent prompt or be blocked.
Step 4 - Configure Redirect URIs
Add or Modify Redirect URIs
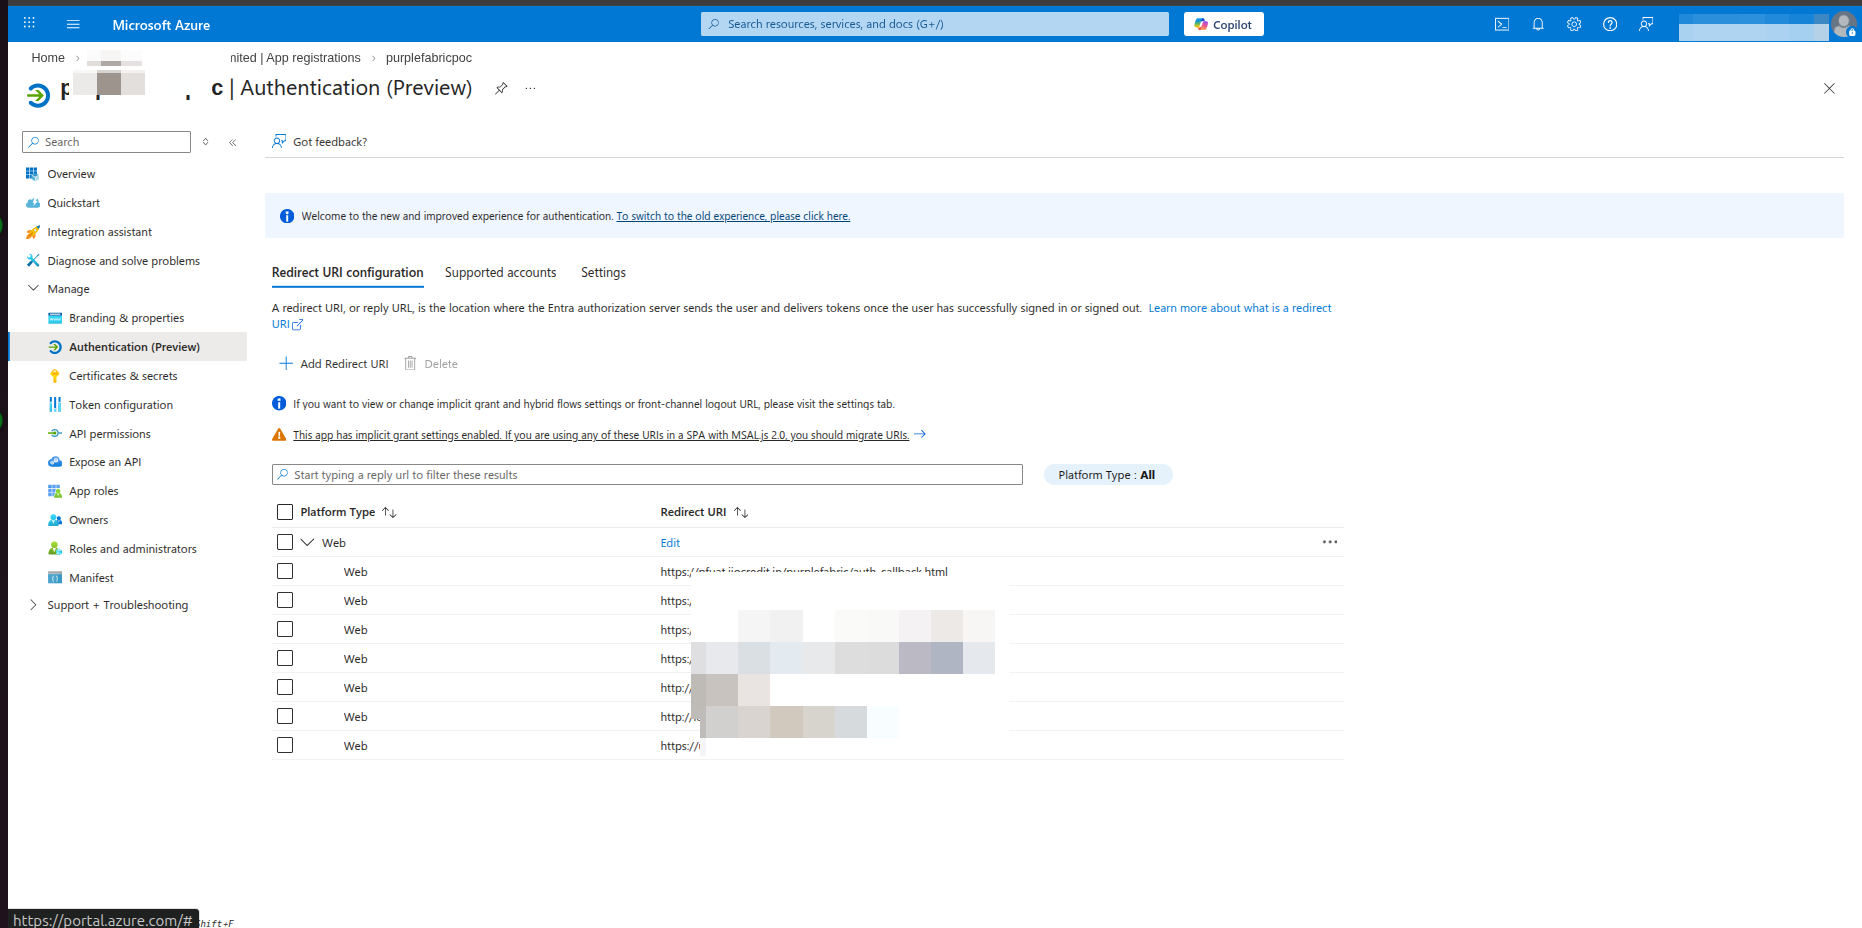
If you already added a redirect URI during app registration (Step 2), you can verify or modify it here. Otherwise, add one now.
In your application page, select Authentication from the left menu.
Under Platform configurations, click + Add Redirect URI.
Choose the platform type that matches your application:
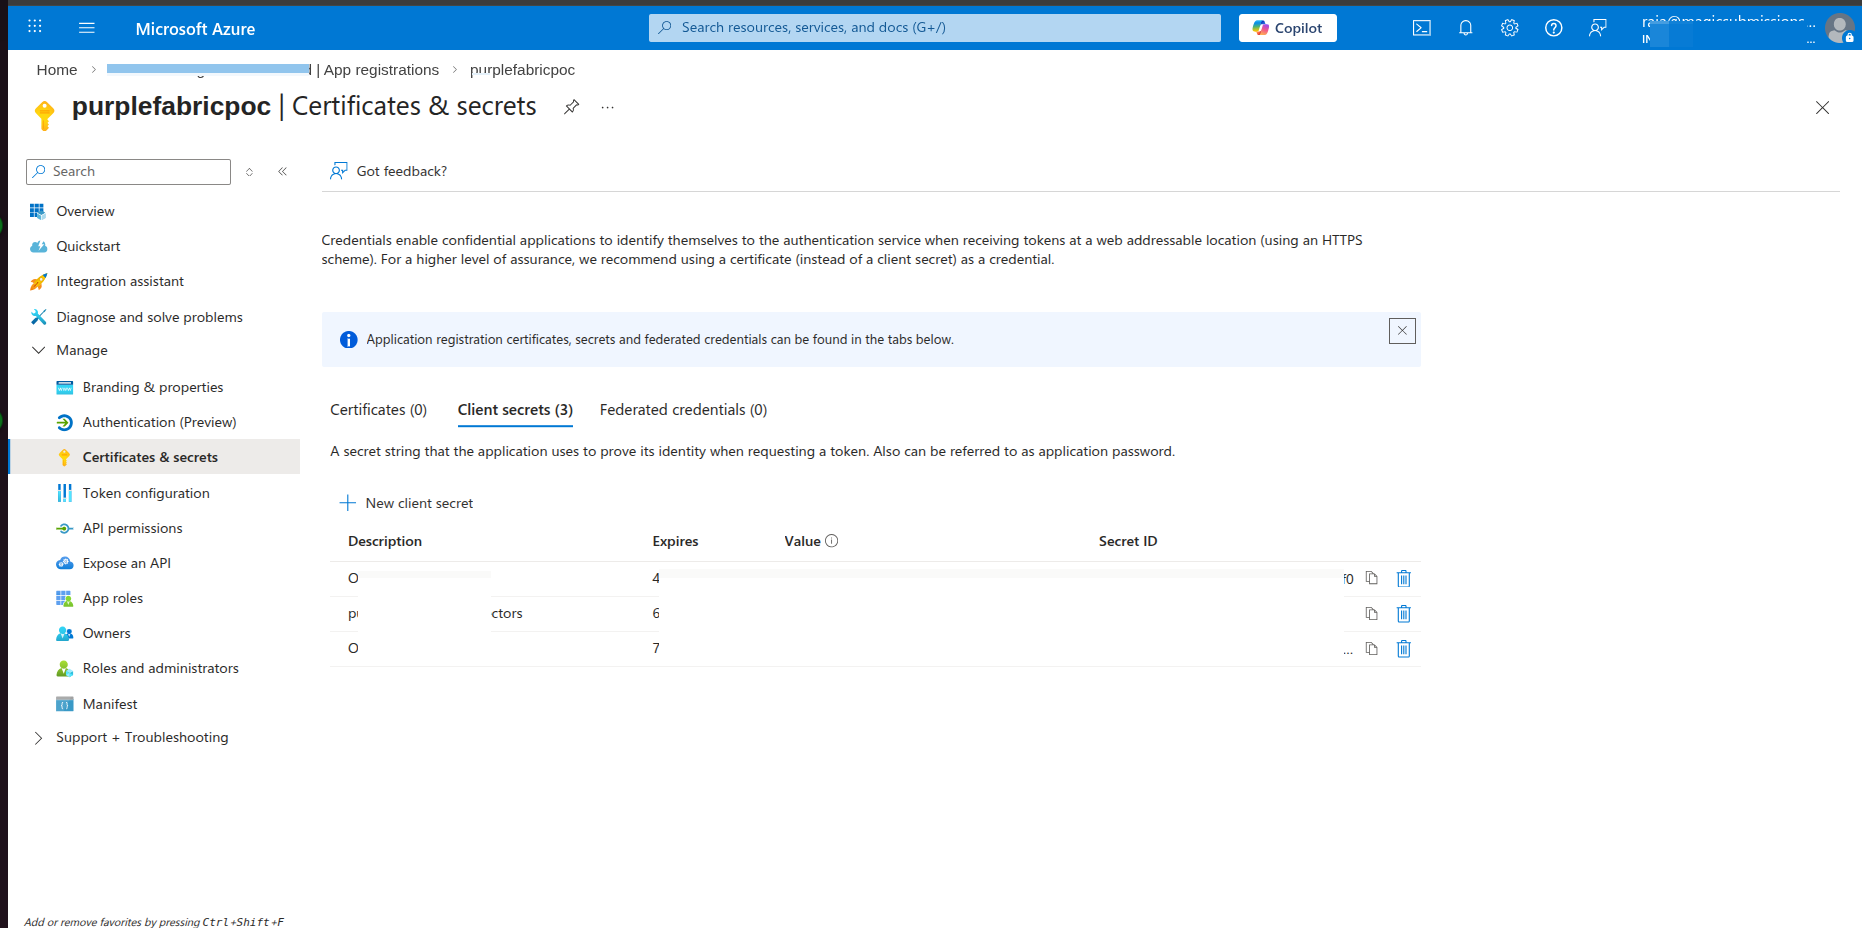
In your application page, select Certificates & secrets from the left menu.
Under Client secrets, click + New client secret.
Enter a description (e.g., M365-Excel-Secret-Prod).
Select an expiration period and click 'Add'.
Copy the Secret Value
Critical:Copy the Value immediately after creation. It will only be displayed once. If you navigate away, you will not be able to retrieve it again.
Field
What to Copy
Value
The actual secret string (copy this)
Secret ID
The identifier for the secret (for reference only)
Step 6 - Verify Cross-Tenant Access
Since you selected the Multi-tenant option during app registration (Step 2), cross-tenant access is already enabled. You can verify this by checking the application manifest.
Verify via the Application Manifest
In your application page, select Manifest from the left menu
The manifest editor will open showing the JSON configuration
Locate and verify the following property:
Property
Expected Value
Description
"signInAudience"
"AzureADMultipleOrgs"
Confirms multi-tenant sign-in is enabled
Example - Correct Manifest Value:
{
"signInAudience": "AzureADMultipleOrgs",
...
}
Possible values for signInAudience:
If "signInAudience" is set to "AzureADMultipleOrgs", cross-tenant access is correctly configured.
If it shows a different value, go back to Authentication and update the Supported account types to "Accounts in any organizational directory".
Connector-Specific Configuration: API Scopes & Redirect URIs
All the steps above (Steps 1 - 8) are common across Microsoft connectors. The only things that change per connector are:
The API permission scopes (each Microsoft service needs different permissions)
The Redirect URI (each Purple Fabric environment has its own callback URL)
Adding Scopes for the Specific Microsoft Connector
Each Microsoft connector (e.g., MS Excel, MS Teams, MS Docs, MS PowerPoint,..) requires its own set of API scopes. You need to add both:
Delegated permissions - for OAuth-based access (user signs in)
Application permissions - for Key-based access (service-to-service, no user)
Follow Step 3 to add the required scopes to the Azure Application.
Refer to the connector details page in PF platform for the exact scopes needed for each service.
Validating That Scopes Are Added Correctly:
Go to Azure Portal -> App registrations -> Select your application
Click API permissions in the left menu
Verify all required scopes are listed under Configured permissions
For Delegated tokens: confirm scopes appear in the scp claim
For Application tokens: confirm permissions appear in the roles claim
Adding the Redirect URI for Purple Fabric
For OAuth-based authentication, the Purple Fabric platform's redirect URI must be registered in the Azure Application. This is where Azure sends the authorization code after user consent.
Follow Step 4 to add the redirect URI.
Redirect URI format:
https://<environment-specific-domain>/purplefabric/auth-callback.html
Replace with the domain for your target Purple Fabric environment.
You're All Set
After completing these steps, your Azure application is configured for OAuth 2.0 with Delegated permissions and KeyBased with Application permission. You can now perform both Key based and OAuth operations with a user's Work or School account to access Online Microsoft 365 Services via the Microsoft connectors.
Share the generatedCLIENT ID, CLIENT SECRETandTENANT IDto the Purple Fabric Team to vault the credentials for Oauth. For Key Based - directly useCLIENT ID, CLIENT SECRETandTENANT IDfor connection.
How to configure OAuth Setup for Google Cloud Connectors
Step-by-step guide to configure Google APIs and OAuth 2.0 Credentials for Purple Fabric Connector Integration.
Important:
This integration supports access to Google Workspace Online services (such as Google Sheets and Google Drive) via authorized user authentication. All API calls are executed dynamically using scopes granted on behalf of the signed-in user.
Introduction
This guide walks you through the comprehensive process of setting up Google Cloud Console OAuth 2.0 credentials to facilitate access to online Google Workspace services through Purple Fabric connectors.
By the end of this guide, you will have:
A dedicated Google Cloud Project.
Active access permissions for required workspace APIs (e.g., Google Sheets and Google Drive).
A fully configured OAuth Consent Screen featuring appropriate scopes and branding.
A unique Client ID and Client Secret deployed for secure connection routing.
Prerequisites
Before you begin, ensure you possess the following criteria:
Requirement
Details
Google Identity Account
A valid Google Account (Google Workspace / Organization account recommended for internal organizational access).
IAM Access Role
Permission permissions within Google Cloud to create and manage projects (Project Creator/Owner roles).
Purple Fabric Target URL
The explicit callback or domain structure mapping out where the response payload routes back to.
Sign in using your Google administrator or developer credentials.
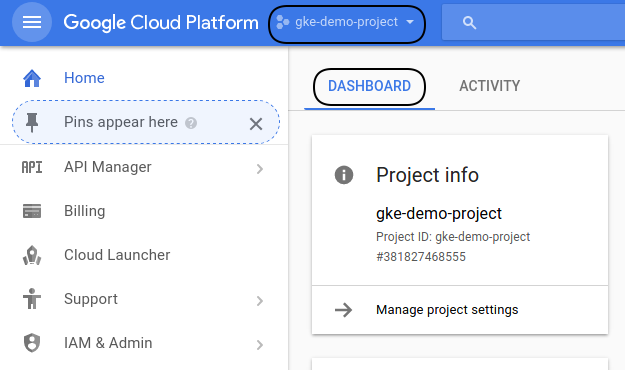
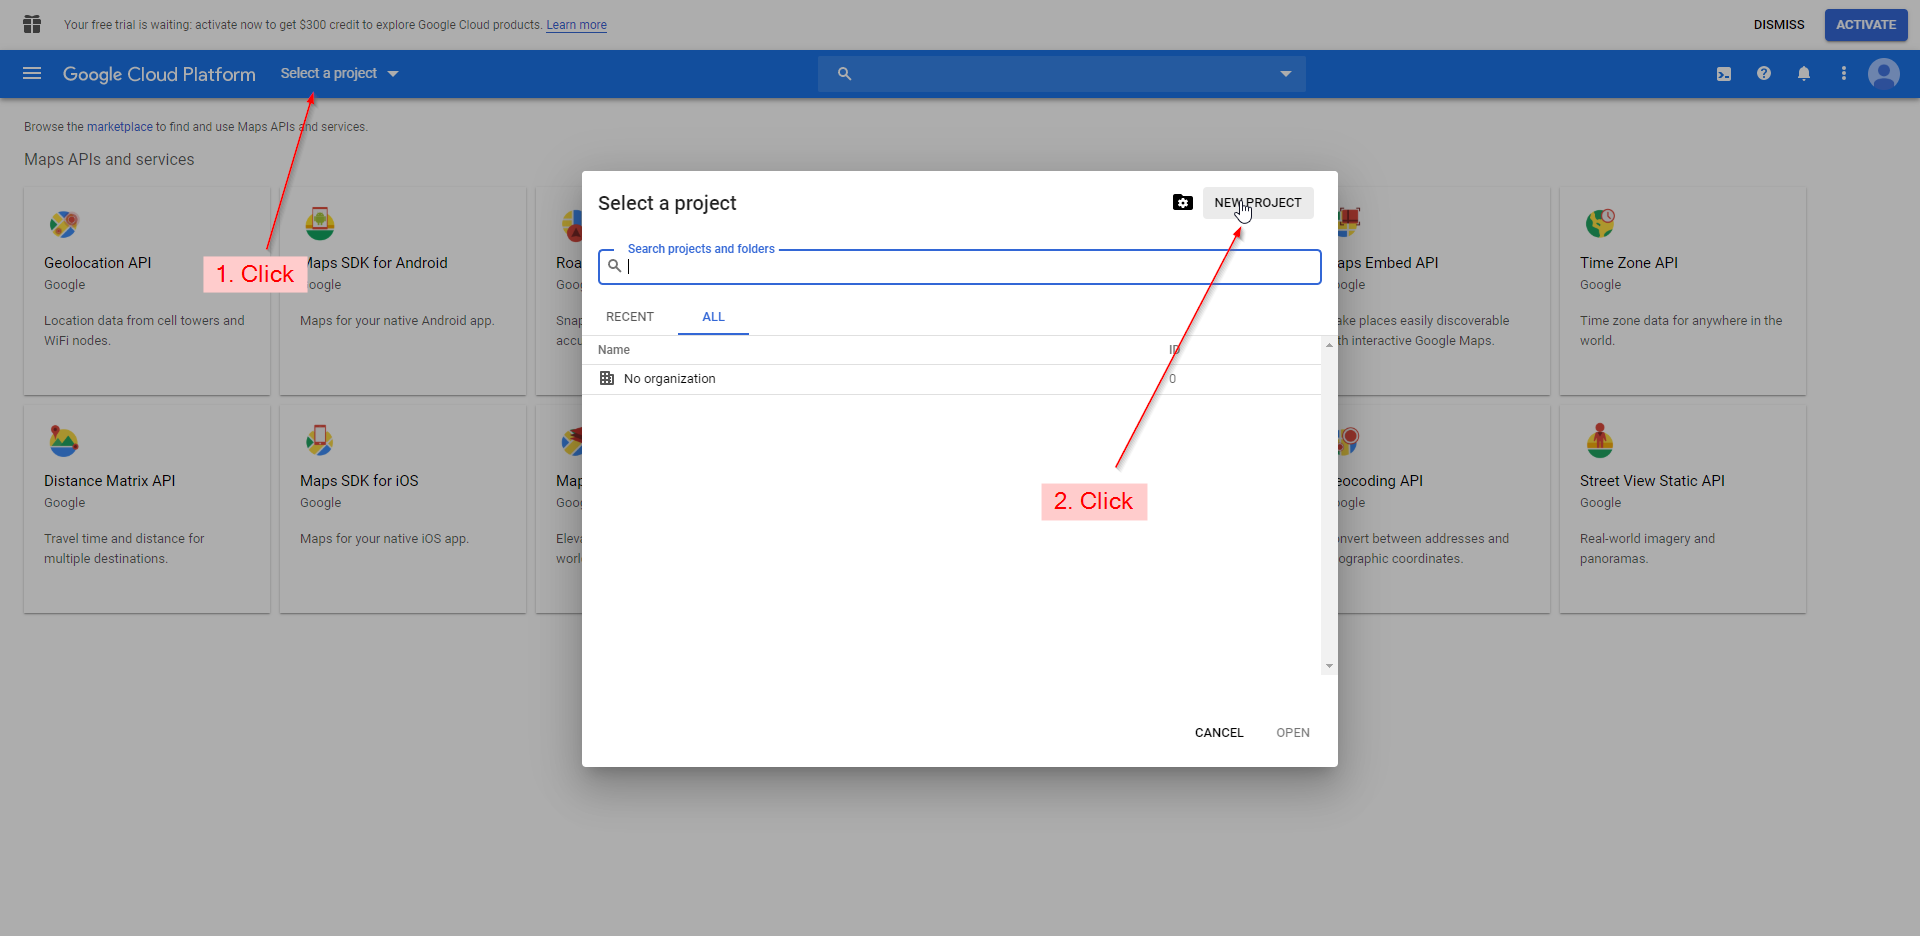
At the top of the page, locate the Project Dropdown menu next to the main platform logo and click on it.
In the overlay modal dialog, click New Project in the upper-right corner.
Complete the project configuration details:
Project Name: Provide a clear, descriptive identifier (e.g., PurpleFabric-Workspace-Integration).
Organization / Location: Select your organization domain if applicable.
Click Create. Wait a few seconds for the deployment notification banner to confirm project readiness.
Step 2: Enable Required APIs for Your Application
To interact with Google services, explicit API access libraries must be initialized for your target project.
Ensure your newly created project is selected in the top navigation dropdown toolbar.
Use the left-hand navigation sidebar to go to APIs & Services → Library.
Locate the search field and lookup the following required service instances:
Google Sheets API
Google Drive API
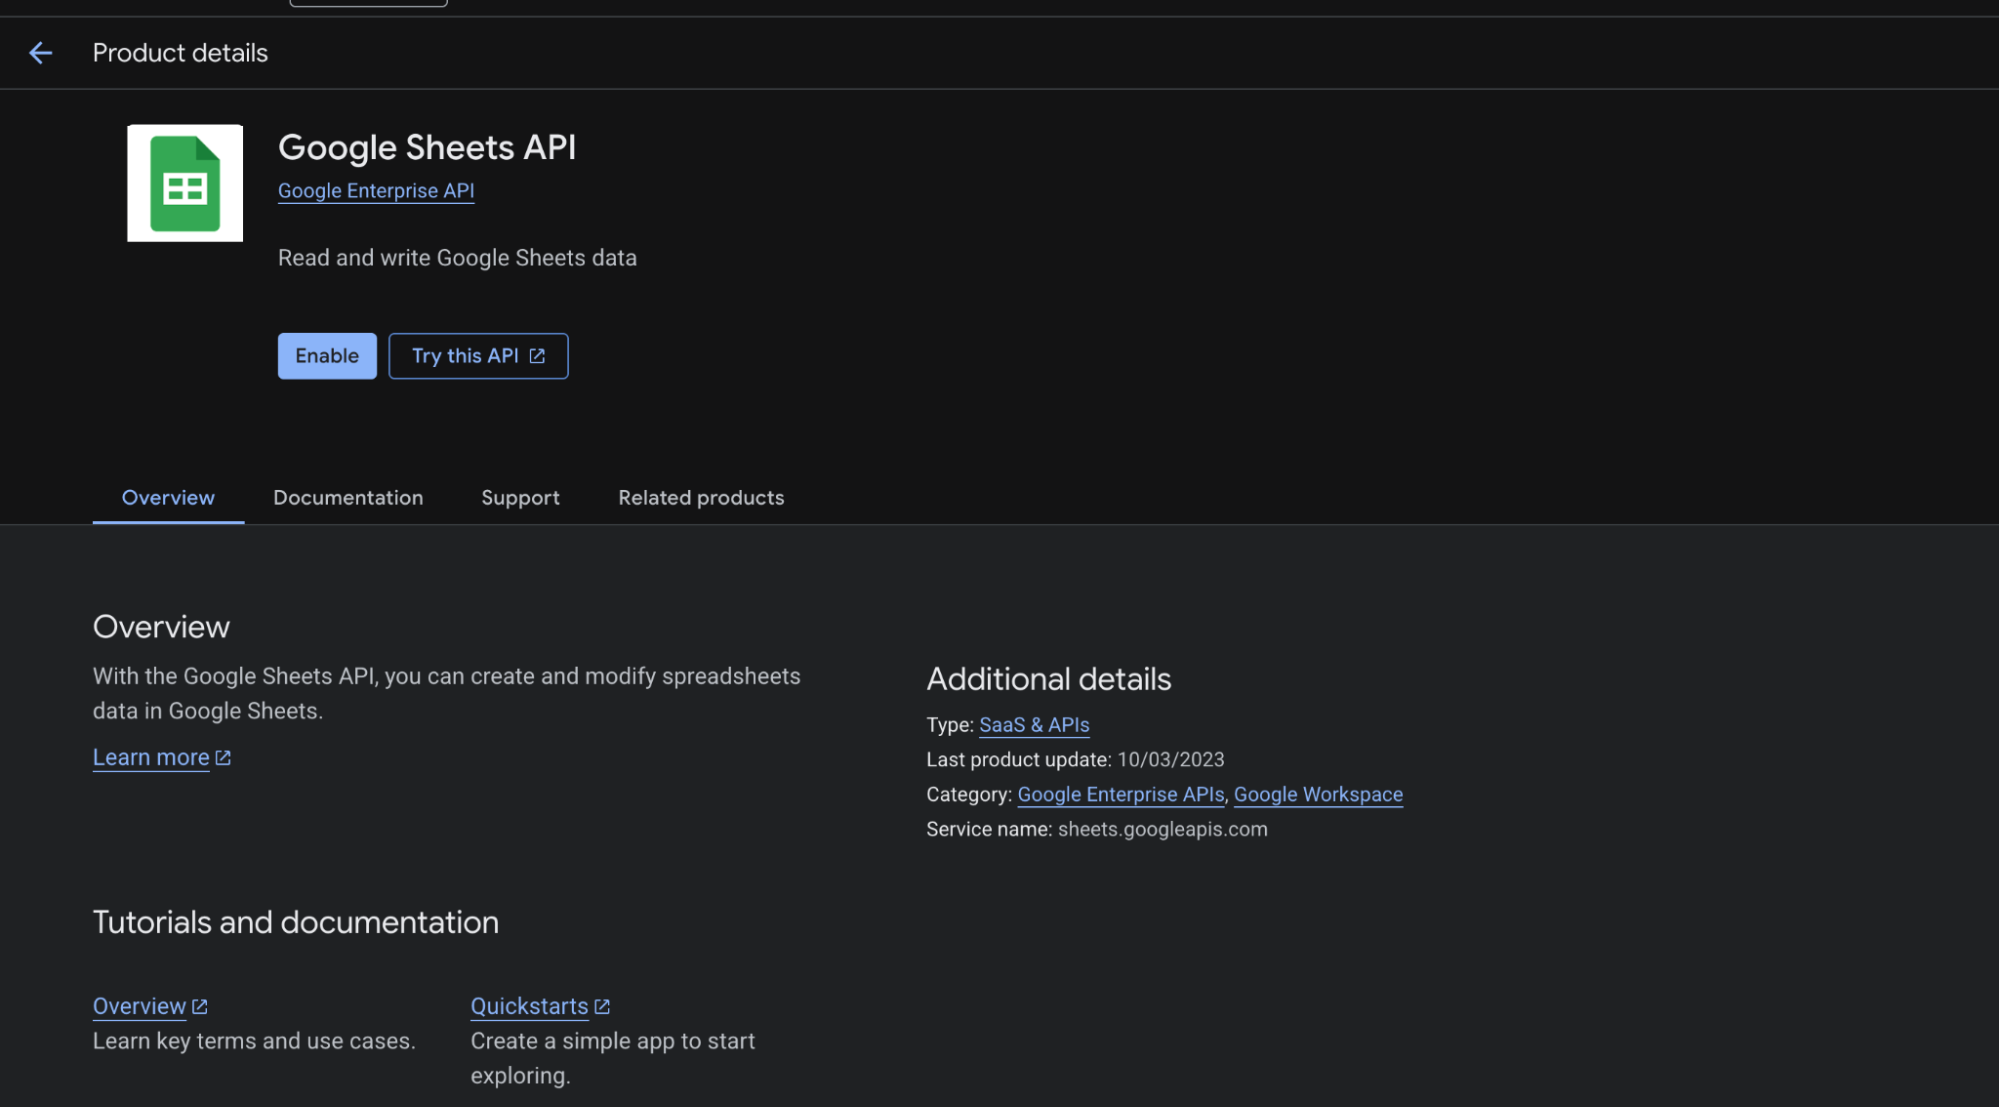
Click on each respective API option card from the filtered gallery list to view its product overview description.
Click the blue Enable toggle button to turn on the runtime interface access layer
Step 3: Configure the OAuth Consent Screen
The OAuth consent screen defines the branding footprint, target audience structure, and security handling parameters exposed to users during login execution.
In the sidebar menu, click APIs & Services → OAuth consent screen.
Choose your application User Type based on structural accessibility needs:
Internal: Restricts access strictly to accounts owned within your workspace enterprise environment. (No rigorous Google verification processing cycle is triggered here).
External: Makes authentication capabilities available to any public Google identity account type. (Triggers official Google review criteria compliance checks).
Click Create.
Provide the fundamental profile details carefully within the App information setup screens:
App name: Enter the public title identifying the integration (e.g., Purple Fabric Connector App).
User support email: Provide an operational tracking mailbox address exposed for support queries.
App logo: Upload an asset image aligning cleanly with Google asset display guidelines.
Developer contact information: Supply standard technical notice point email addresses.
Define Authorized Domains by entering the core hostname matching the environment layout (e.g., jiocredit.in or specific enterprise domains).
Provide valid links for deployment integrity:
Application Homepage Link
Application Privacy Policy Link (Mandatory Requirement)
Scopes establish boundary metrics limiting what data fields can be managed dynamically through active API tokens.
On the Scopes subsection phase step of the OAuth Consent configuration flow, click Add or Remove Scopes.
A panel filter drawer will display. Look up and check the following core tracking parameters based on your connection service scope needs: Click Update to view the consolidated scopes listed under configured summaries.
API Scope
Permission Tier
Technical Purpose
.../auth/spreadsheets
Restricted
Full administrative read, write, modify, and delete access over Google Sheets files.
.../auth/drive
Restricted
Comprehensive manipulation tracking access across all file instances inside Google Drive folders
Click Save and Continue.
Step 5: Create OAuth 2.0 Client Credentials
After defining the technical boundaries, generate the operational API application token keys.
Select APIs & Services Credentials from the left-side panel layout.
Click + Create Credentials at the top of the screen option bar, then pick OAuth client ID.
Set the Application type dropdown choice value field to Web application.
Fill out the endpoint route mapping configurations:
Name: A descriptive title (e.g., PurpleFabric-Web-Client).
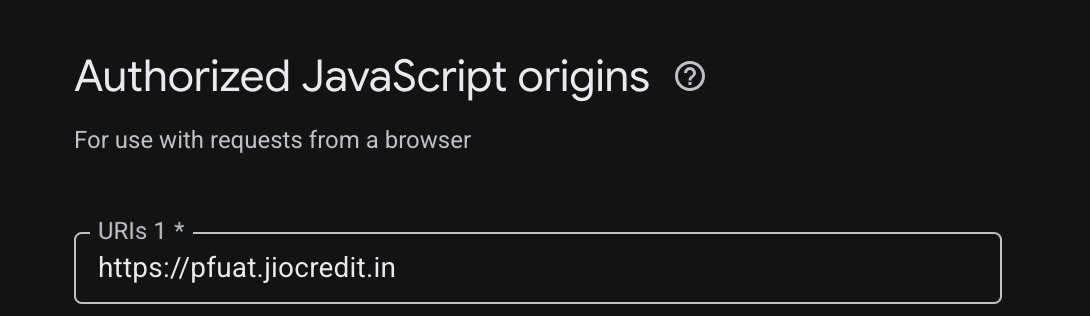
Authorized JavaScript origins: Enter your base environment platform web domain URL:
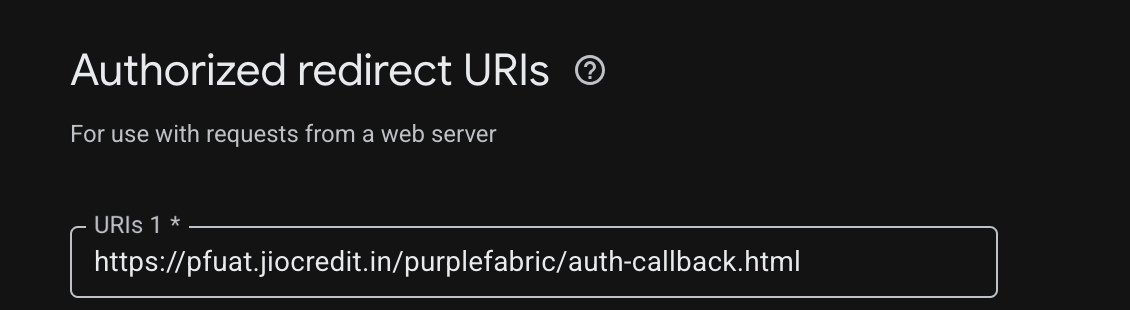
Authorized redirect URIs: Provide the full, explicit callback handler location route used by Purple Fabric to manage data payloads returned after user sign-in validation:
An OAuth client created confirmation panel will pop up instantly. Copy the following items to your secure vault environment right away:
Client ID
Client Secret
CRITICAL NOTE: Share the generated Client ID and Client Secret strings directly with the designated Intellect / Purple Fabric Operations Team. They will vault these items in your platform vault architecture to run the Google connector modules securely.
If you marked your application configuration profile as External while utilizing restricted scopes (like direct broad drive parameters), formal verification is required prior to production handoff.
Required Review Artifacts:
Demo Video (Extremely Critical): Record a clear screen walk-through capturing the entire user authentication journey. It must explicitly show the OAuth grant prompt screen, verify how data parameters map back, and display the platform dashboard elements utilizing the resulting payload securely.
Detailed Written Justification: Outline a functional explanation explaining why your operations necessitate the specific high-level restricted scopes over less intrusive permissions.
Compliant Privacy Policy: The privacy disclosure landing page must accurately outline exactly how user file information is parsed and stored without ambiguity.
Submission Checklist:
Navigate back to APIs & Services OAuth consent screen.
Review all settings parameters, click Publish App, and submit the form for formal verification.
Timeline Expectation:
Sensitive Scopes: Typically processed within ~3 to 7 business days.
Restricted Scopes: Can take several weeks and may require an external security auditing check.