
Admin
Overview
The Admin Module is the central management hub of the platform, designed to provide administrators with total oversight and control over the application's infrastructure, security, and intelligence. Here, the high-level configurations are managed to ensure that end-users have a seamless, secure, and AI-powered experience in their respective workspaces.
By centralizing these administrative functions, the platform ensures consistent governance across different teams while providing the flexibility to scale AI capabilities as organizational needs evolve.
Refer to the following sections to know more about the different functionalities available in Admin module:
Workspaces User Management Model Hub Connections URL Aliases
Workspaces
The Workspaces section in the Admin module serves as the foundational framework for creating and managing collaborative environments. From the main dashboard, administrators can monitor existing workspaces, track member counts, and view modification history via a searchable list. Beyond basic setup, the module provides granular access control by enabling administrators to add members and assign specific functional policies.
How-To: Create a new Workspace
Perform the following steps in the Purple Fabric to create a new workspace:
Only Tenant admins can create new Workspaces
Step 1: Accessing the Admin Module
- Go to Admin module from the menu on the left hand side of the application. The contents of the Workspace tab appears as default
- Click Create New to create a new workspace
Step 2: Enter Basic Details
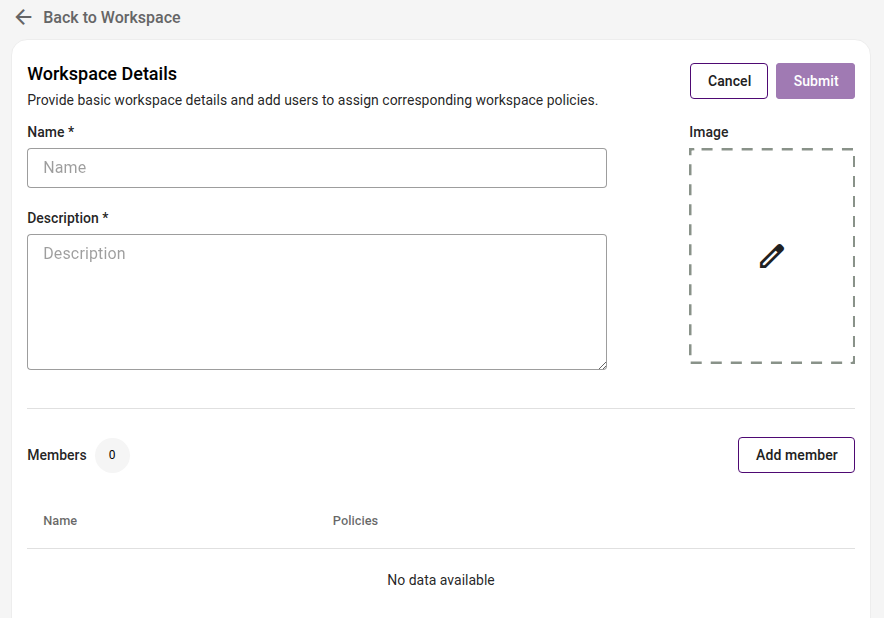
In Create new workspace screen, fill the following fields:
- Name: Enter a unique name for the workspace
- Description: Provide a brief summary of the workspace's purpose (e.g., ‘QA testing’ or ‘Project Alpha’)
- Image (Optional): You can upload a workspace icon by clicking the image placeholder on the right
Step 3: Adding Members
To give users access to the workspace:
- Click the Add member button if you need to add tenants. An Add Members pop-up appears
- Search for users by name or email
- Check the box next to the desired user(s) and click Add
Step 4: Assigning Workspace Policies
Once a member is added to the list, you must define their permissions:
- Click the Policies dropdown field next to the user’s name
- Select one or more roles from the list:
- Creator
- Viewer
- GenAI_User
- Workspace_Admin
- GenAI_User_Demo
- GenAI_Consumer
- GenAI_Partner_User
- Gen
- AI_creator_without_workflow
- GenAI_Controller
- Manager
- Reviewer
- Annotator
- Use_Case_Enabled_GenAI_User
- Validation: Ensure all added members have at least one policy assigned, or a "Policies is required" warning will prevent submission
Step 5: Finalizing Creation
- Review all details (Name, Description, and Member Policies)
- Click the Submit button in the top right corner
Upon successful creation, you will be redirected to the dashboard with a toast message: ‘Workspace created successfully.’
User Management
The User section in Admin oversees and controls the platform access for different users. From the main dashboard, administrators can monitor the entire user directory, track last login activity, and quickly locate accounts via a searchable list. The module streamlines the onboarding process by allowing for the creation of new profiles with distinct permission levels. To ensure secure and organized access, administrators of Purple Fabric can assign high-level roles such as Tenant Admin for full platform control or Standard User for restricted access while mandating specific workspace memberships to define exactly where and how a user can collaborate.
How-To: Create a New User
Perform the following steps in the Purple Fabric to create a new user:
Only Tenant admins can create new Users
Step 1: Accessing the Admin Module
- Go to Admin module from the menu on the left hand side of the application. The contents of the Workspace tab appears as default
- Click User Management. The users section appears with the list of existing users
- Click Create User
Step 2: Enter Account Information
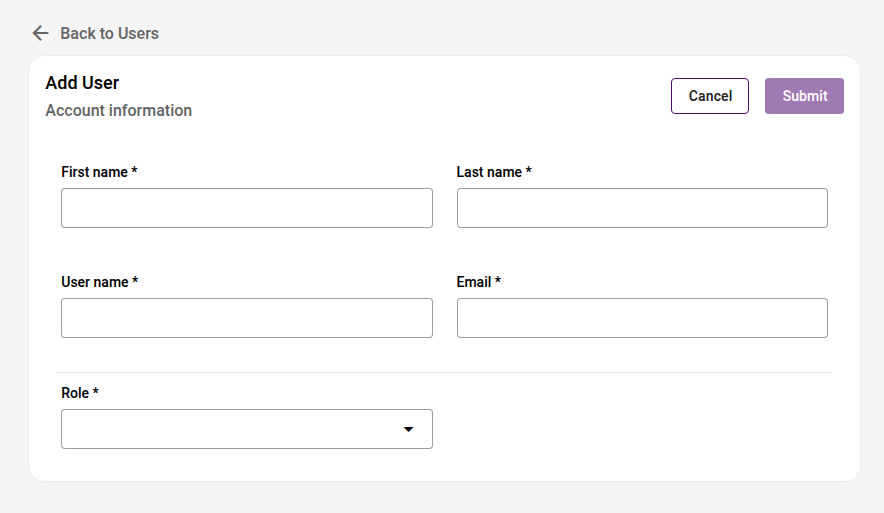
In Create New User screen, fill in the following fields:
- First name & Last name: Enter the user's legal name
- User name: Assign a unique login identifier
- Email: Provide a valid email address for account notifications
Step 3: Assign a Role
Click the Role dropdown to define the user's platform-wide permissions:
- Tenant Admin: This role grants full access to the entire platform across all workspaces. No further workspace assignment is required
- Standard User: This is a restricted role. A standard user must be added to a workspace and assigned specific policies to see any content
Step 4: Workspace Access (Standard Users Only)
If you select Standard User in Role, a Workspace access section appears:
- Selection: You should choose at least one workspace from the dropdown
-
Policies: Once a workspace is chosen, ensure the appropriate policies are assigned for that specific environment
Select one or more roles from the list:
- Creator
- Viewer
- GenAI_User
- Workspace_Admin
- GenAI_User_Demo
- GenAI_Consumer
- GenAI_Partner_User
- GenAI_creator_without_workflow
- GenAI_Controller
- Manager
- Reviewer
- Annotator
- Use_Case_Enabled_GenAI_User
Step 5: Submission
- Review the account details and role assignments
- Click ‘Submit’ to create the user account
Upon successful creation, you will be redirected to the dashboard with a toast message: ‘User created successfully.’
Model Hub
The Model Hub manages the Large Language Models (LLMs), Embedding models, and Rerankers available across Purple Fabric. This module provides full lifecycle management for AI models, enabling administrators to authenticate cloud provider connections, maintain active inventory, optimize base parameters, and orchestrate dynamic performance mappings across all system features. Administrators can oversee model deployment using a clear, multi-tiered framework split into base level availability, custom parameter adjustments, and platform-wide feature mappings.
Model Catalog
How-To: Add Custom Models
Perform the following steps in Admin - Model Hub to add a customized model:
-
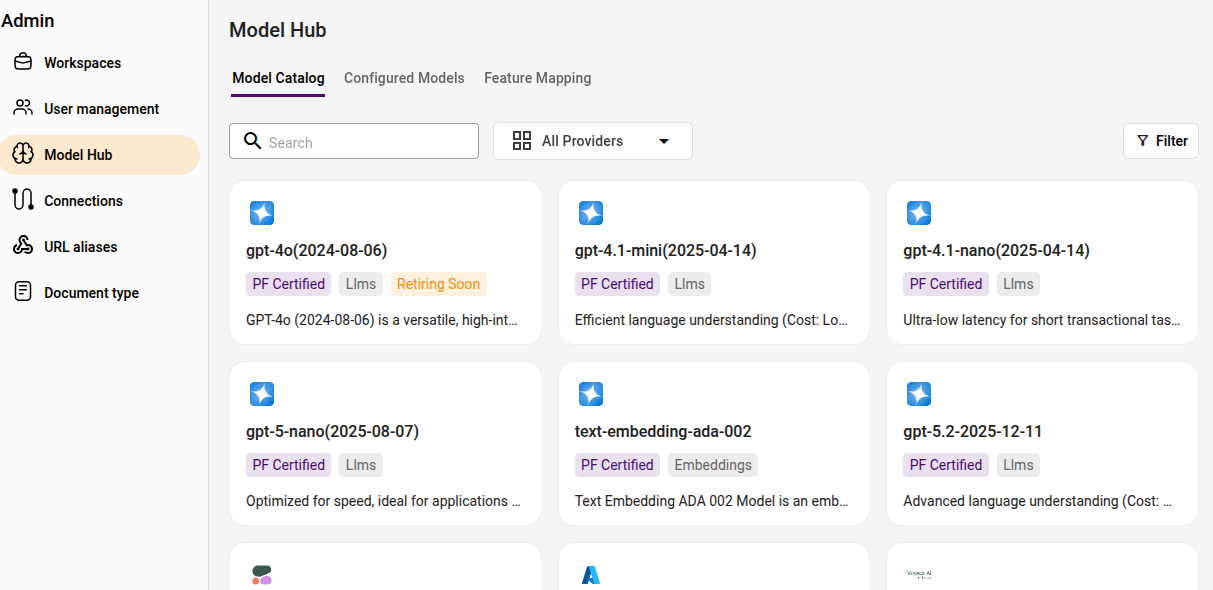
Go to Admin module and navigate to the Model Hub section. The Model Catalog tab contents appears as default. Here, you can view the models available for different providers in Purple Fabric. You can view the categorized models available by using the providers drop-down and filter option
-
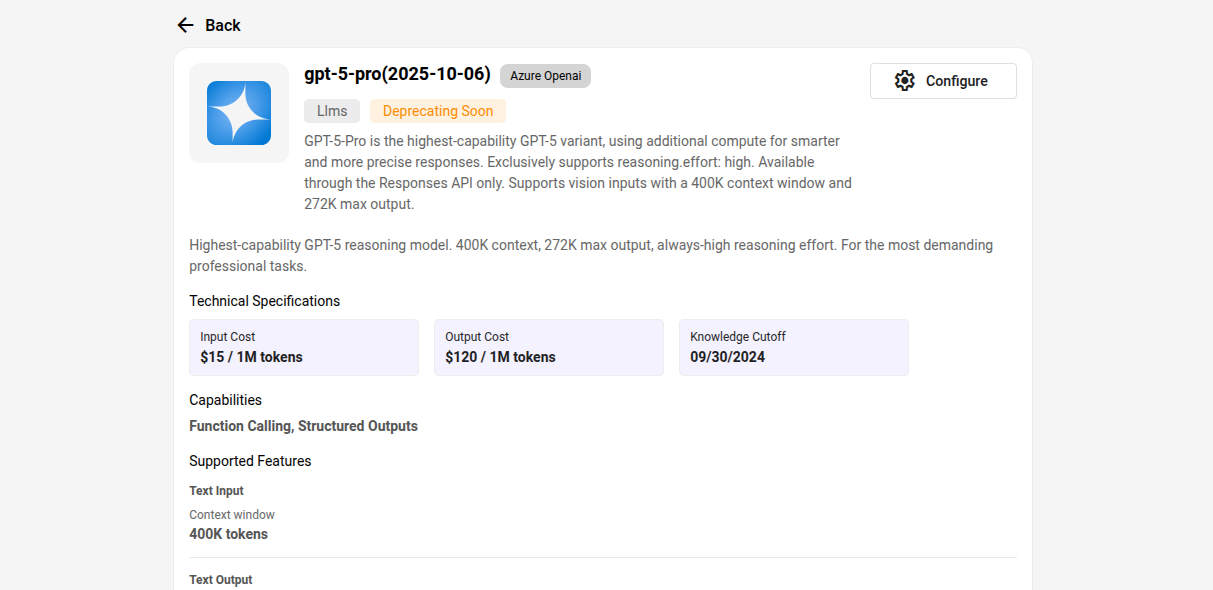
Click on any one of the models. Now, you can view the model details along with the technical specifications, capabilities, prerequisites, etc.
-
Click the configure button to set up the model.
-
Provide the Display Name and Model Argument details such as, Deployment Name, API key and version number along with the endpoint information.
-
Click Submit to commit the model to the platform.
Upon successful addition, the configured model is listed in the Configured Models tab.
Configured Models
The Configured Models tab reviews, manages, and maintains the operational integrity of all active and at-risk AI models linked to the platform. From this screen, the administrators can easily verify active model variants, track their structural certifications, and access immediate risk assessment tools for models facing deprecation or retirement.
Feature Mapping
The Feature Mapping tab provides administrators with precise control to customize, search, and override AI models for specific business tasks rather than using a single global fallback. Features are neatly organized into collapsible groups that use smart visual badges to track configuration progress across different workspaces.
How-To: Configure Features Model Mapping
Perform the following steps to manage platform-wide baseline models and feature-specific models:
Managing Granular Feature Overrides
To map specialized models to independent technical operations:
- Click the Feature Mapping tab.
- Check the top of the pane for Deprecated Model Alerts. If any production features use retiring assets, click the inline Replace button to swap them out for a recommended model variant.
- Locate features easily by typing keywords or categories into the dedicated feature Search Bar.
- Expand the collapsible, organized Feature Groups to find specific technical components:
- Safety & Compliance
- Retrieval & Search
- EKG / Knowledge Graph
- Document Processing
- Enterprise GPT Tools
- Benchmarking & Evaluation
- Asset & Assistant Generation
Step 3: Configure Fallbacks and Priorities
- Review the feature card's selection label to confirm its behavior:
- Selection Type: Single Model
- Selection Type: Multiple Models (Fallback Supported)
- On multi-model features, select multiple active engines in the input panel. The first model block acts as your Primary Model, and subsequent items serve as operational fallbacks.
- To alter the priority order, click and hold the drag handle on any chosen model block and slide it horizontally. The model positioned on the absolute left will be called first.
- Click Save Configuration to apply the settings. Once all features within an organizational group are fully configured, the group's title indicators dynamically turn Blue.
Step 4: Resetting Configurations
- If you need to wipe out custom experiments, click the Reset Configuration button.
- Review the safety confirmation warning prompting you that all feature-level overrides will be erased.
- Confirm the action to instantly realign all feature behaviors back to the baselines set in the Global Preferred Models tab.Inside your project folder, look for a hidden folder named .retype (or whatever your custom build output folder is).
- Open the index.html file inside that folder.Selection Type: Single Model
- Selection Type: Multiple Models (Fallback Supported)
- Look near the very top of the HTML code (inside the <head> tags). You will see a generator meta tag that looks like this:
How-To: Perform Deprecation Impact Analysis
Perform the following steps in Purple Fabric to assess and address at-risk models:
Step 1: Locate At-Risk Models
- Navigate to the Model Hub component inside the Admin panel.
- Click the Feature Mapping tab.
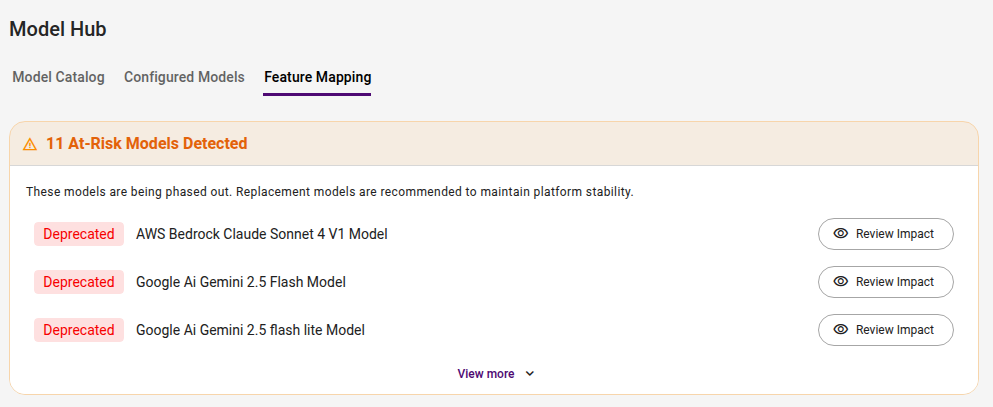
- If any models are near their end-of-life cycle, a prominent warning alert banner labeled "At-Risk Models Detected" will automatically surface at the top of the interface, as shown in the below screenshot.
Step 2: Initialize Impact Review
- Review the distinct alert tags listed inside the notification container:
- Deprecated: The model is no longer actively developed or recommended, but is still temporarily functional.
- Retired: The model has reached official end-of-life status and requires immediate remediation to prevent system failures.
- Locate the specific target model item (e.g. AWS Bedrock Claude Sonnet 4 V1 Model) and click the corresponding Review Impact button on the right-hand side of the row
Step 3: Analyze the Recommended Migration Path
- Upon clicking, an Impact Analysis modal window will display, as shown below.
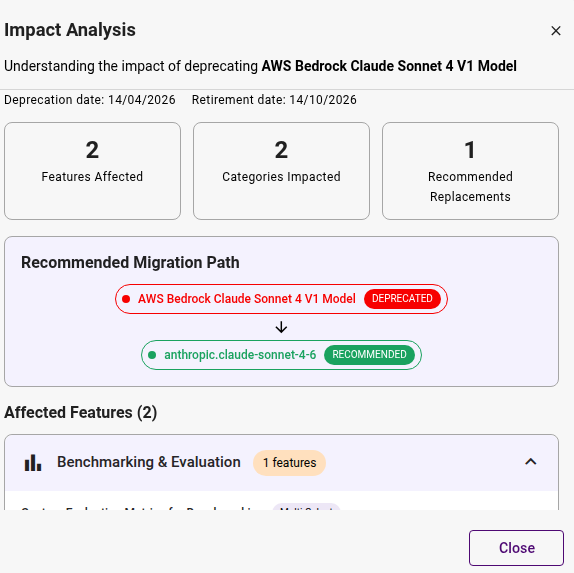
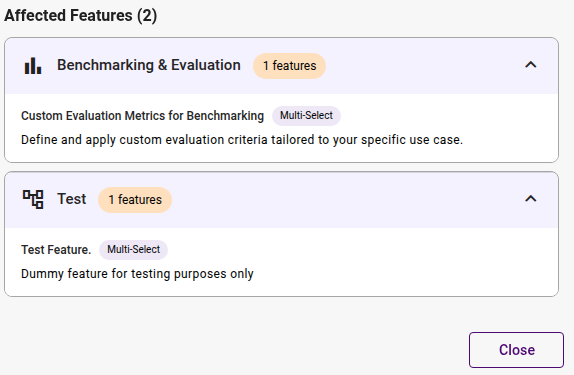
- Review the telemetry summaries at the top of the modal to evaluate the scope of exposure:
- Features Affected: Shows the total count of operational application features utilizing this at-risk model.
- Categories Impacted: Displays the aggregate number of feature categories requiring attention.
- Recommended Replacements: Indicates the count of verified alternative models available.
- Look at the Recommended Migration Path visualization panel to find the direct upgrade path (for example, migrating from the red-tagged
AWS Bedrock Claude Sonnet 4 V1 Modeldown to the green-taggedanthropic.claude-sonnet-4-6 - Click Close once your audit is complete, and navigate to the mapping sections to execute the recommended migrations.
How-To: Configure and Prioritize Feature Overrides
Perform the following steps in Purple Fabric to adjust model allocations across specific application capabilities:
Step 1: Access the Feature Mapping Interface
- Navigate to Feature Mapping in the Model Hub section
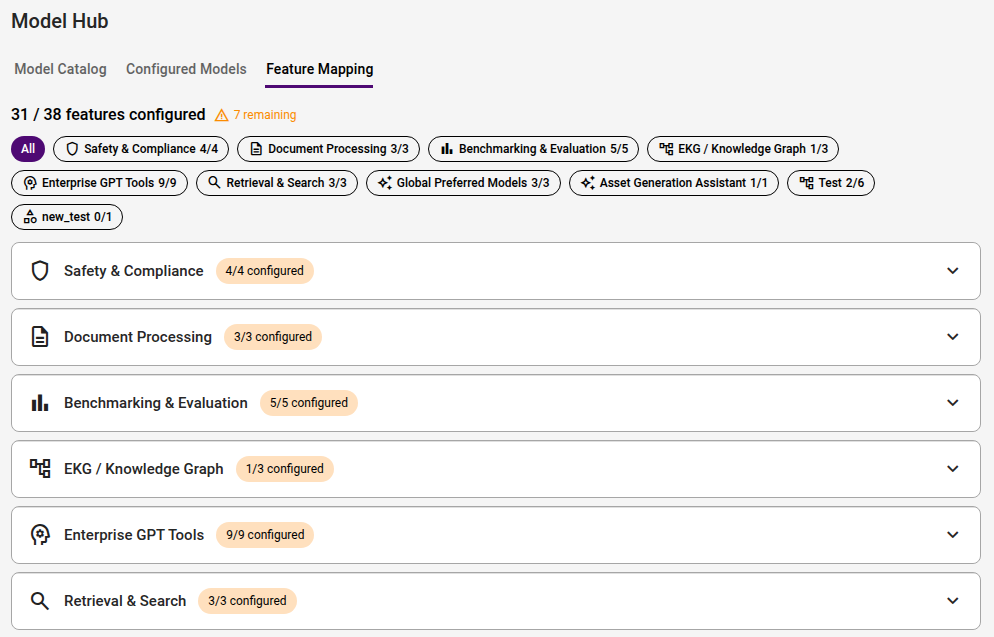
- The main dashboard view displays a comprehensive live audit metric along with an inline warning indicating the number of remaining items left to configure
Step 2: Configure Single-Select Features
-
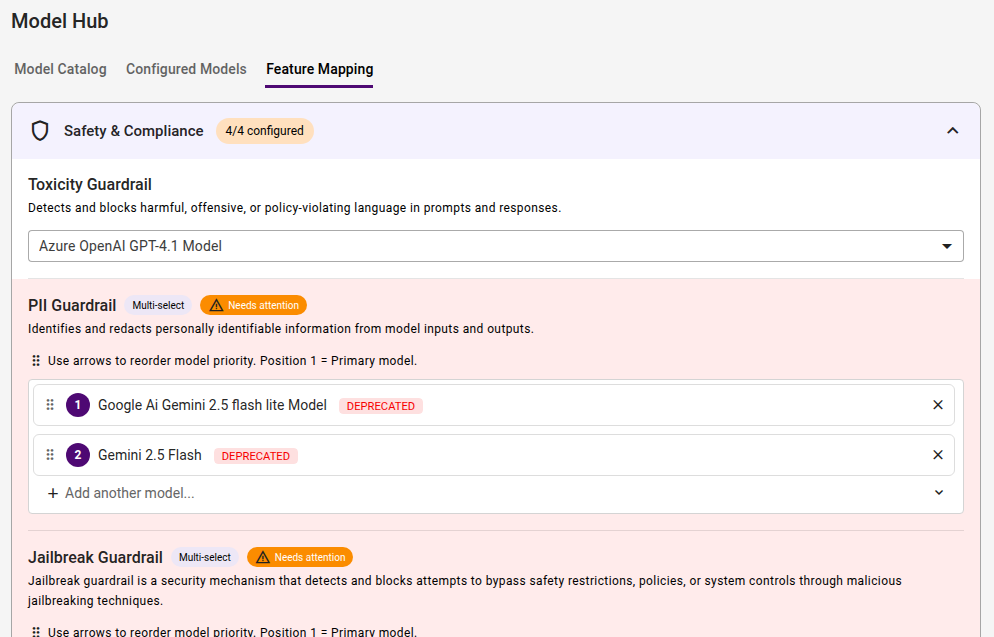
Locate and expand your desired group accordion (for example, opening Safety & Compliance
-
Find a feature designated for single-model allocation (such as Toxicity Guardrail).
-
Click the model selection dropdown menu and pick your choice from the list of authenticated models.
Step 3: Configure Multi-Select Features and Fallback Priority
- For advanced safety configurations that support backup systems, locate a multi-select feature (such as PII Guardrail or Jailbreak Guardrail).
- To introduce an additional backup option, click the + Add another model expandable command bar.
- Arrange Priority: Review the numbered position tags. The model positioned at Position 1 acts as the primary inference engine. To adjust the fallback priority order, use the drag handle icon next to the model item to rearrange the stack sequence.
- To completely remove an assigned model variant from the fallback pipeline, click the trailing X icon on the right edge of its respective container row.
Step 4: Finalize and Save Configuration Changes
- As you complete each feature setup, look for the colored status indicator badges located directly next to the group names.
- Once every required feature inside a group is fully assigned, scroll down and click the Save button to apply your new routing rules across the entire platform.
Connections
The Connections section in the Admin module is a secure vault for managing external service integrations. By managing these at the administrative level, the platform ensures that sensitive tokens and keys are encrypted and available for use across various workflows without exposing the raw credentials to end-users.
How-To: Create a New Connection
Perform the following steps in Purple Fabric to create a new connection:
-
Go to Admin module from the menu on the left hand side of the application. The contents of the Workspace tab appears as default
-
Go to Connections. You will see a list of existing connections with their Name, date and Provider details
-
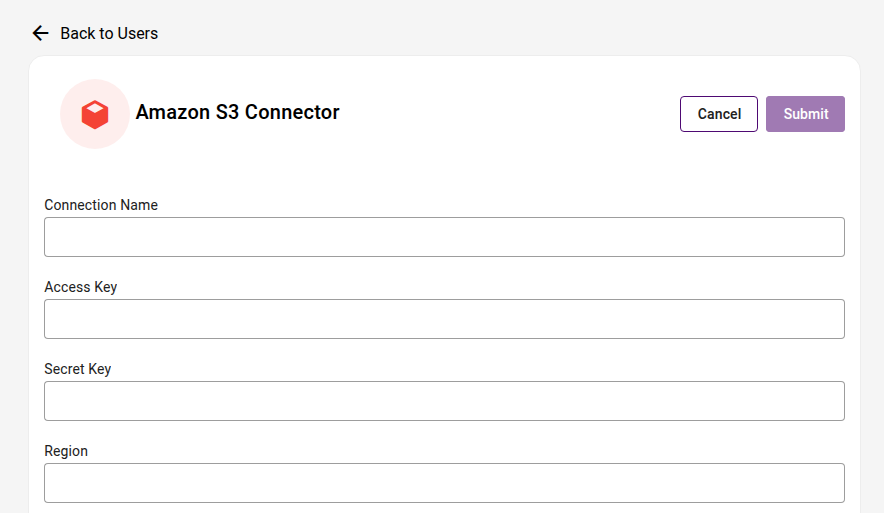
Click Add Connection. The Connection screen appears
-
Choose the service you want to connect centre
-
Provide a connection name and fill the description
-
Paste the Personal Access Token or API Key in Access Token field
-
Review the details to ensure the token has the correct permissions (scopes) required for your intended use case and click Submit
Upon success, you will see a notification: ‘Connection added successfully’
URL Aliases
What is URL Alias?
A URL Alias is a custom, stable name that acts as a reference to a specific Agent and Agent Version. It functions as a bridge between your external applications and the Purple Fabric’s agents.
Why use URL Aliases?
Agents are frequently modified and updated, creating new version IDs. Without an alias, every time you modify an agent to a new version, you would need to manually update the API endpoints in every application that integrates with it.
URL Aliases enables you to decouple the integration URL from the specific agent version.
Key Benefits
- Seamless Transitions: When you modify an agent, you can simply update the alias to point to the new version. Your third-party applications continue to work without any code changes.
- Stable Integration: Your API endpoints remain constant, using the Alias Name rather than a changing Asset ID.
URL Aliases can only be created for Automation agents and not Conversational agents.
How-To Guide
Accessing URL Aliases
- Log in to the platform.
- Navigate to the Admin module.
- Click on the URL Aliases component.
- You will see a list of existing aliases displaying: Alias Name, Mapped Agent, Agent Version, Modified At, and Owner.
Creating a New Alias
- Click the Create new button.
- Alias Name: Enter a unique name for your alias (Min 6, Max 20 characters).
- Note: Alphanumeric characters and basic special characters are allowed.
- Mapped Agent: Select the specific Agent you wish to map.
- Agent Version: Select the specific version of the agent you want this alias to use.
- Click Submit to save.
Updating an Alias (Modifying Agents)
Scenario: You have modified your agent and want your live application to use the new version.
- Click on the specific URL Alias name in the list.
- This will open the Alias Detail Page.
- Click the Edit button.
- Change the Agent Version dropdown to the new desired version.
- Click Submit.
Result: Any application calling this alias will now immediately interact with the new version.
Downloading API Specifications
To integrate the aliased agent into a third-party application, you need the OpenAPI specification for the specific version mapped to the alias.
- Click on the URL Alias in the list to open the Detail Page.
- Locate the menu (three vertical dots) and click Download API.
This will download the API specification specifically for the version currently mapped to this alias in JSON format.
Deleting an Alias
- Click on the URL Alias in the list to open the Detail Page.
- Locate the menu and select the Delete option.
The selected URL Alias is deleted
FAQs
Q: Can I rename an alias after I create it?
A: No. Once an alias is created, the name is fixed to ensure link stability. If you need a different name, you must delete the existing alias and create a new one.
Q: Who can create or edit aliases?
A: Standard Users and Tenant Admins can create and edit aliases.
Q: What happens if I modify an agent version while an alias is pointing to it?
A: The alias points to a specific Version ID. If you modify an agent, a new Version ID is usually created. You must go to the Alias settings and update it to point to the new version for the changes to take effect in your integration.
Q: Can we create URL aliases for all kinds of agents?
A: URL Aliases are only applicable to Automation agents and not Conversation agents.
Troubleshooting
Limitations
- Asset type: URL Aliases are only applicable to Automation agents and not Conversation agents.